Garmin Vector 2S Owners Manual
Garmin Vector 2S Manual
 |
View all Garmin Vector 2S manuals
Add to My Manuals
Save this manual to your list of manuals |
Garmin Vector 2S manual content summary:
- Garmin Vector 2S | Owners Manual - Page 1
Vector™ 2 and Vector 2S Owner's Manual June 2015 Printed in Taiwan 190-01867-00_0B - Garmin Vector 2S | Owners Manual - Page 2
of such marks by Garmin is under license. Exustar™ is a trademark of Exustar Enterprise Co. Ltd. Mac® is a registered trademark of Apple Computer, Inc. Shimano® is a registered trademark of Shimano, Inc. Training Stress Score™ (TSS), Intensity Factor™ (IF), and Normalized Power™ (NP) are trademarks - Garmin Vector 2S | Owners Manual - Page 3
Pod ...... 8 Installing the Right Pedal 8 Appendix 8 Registering Vector 8 Power Data Fields 8 Troubleshooting 9 Updating the Software Using Vector Updater 9 Updating the Vector Software Using the Edge 1000 9 Understanding the Multiple Status LED Flashes 9 Performing a Static Torque Test 10 - Garmin Vector 2S | Owners Manual - Page 4
- Garmin Vector 2S | Owners Manual - Page 5
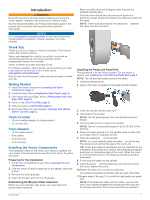
years of service out of your Vector, go to www.garmin.com/vectorowner. Now it's time to put the power under your feet and get out there and ride. Getting Started 1 Install the Vector components (Installing the Vector Components, page 1). 2 Install the shoe cleats (Installing the Shoe Cleats, page - Garmin Vector 2S | Owners Manual - Page 6
the Vector S system. 1 Apply a thin layer of grease on the pedal spindle threads. 2 Insert the spindle into the crank arm. 3 Hand tighten the spindle. 4 Use the pedal wrench to tighten the spindle. NOTE: Garmin recommends torque of 25 to 30 lbf-ft. (34 to 40 N-m). Installing the Shoe Cleats NOTE - Garmin Vector 2S | Owners Manual - Page 7
Rotate the pedals a few times in order to activate Vector. 2 From the home screen, select > Sensors > > Sensor Details > Crank Length. 3 Enter the crank length, and select . Setting the Installation Angle Before you set the installation angles, you must set the Edge data fields to display power and - Garmin Vector 2S | Owners Manual - Page 8
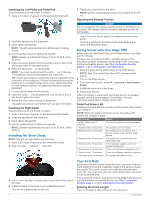
instructions. Garmin Connect You can connect with your friends on Garmin Connect. Garmin pedal has a lefthanded (reverse) thread. As you unscrew the pedal, the pedal pod cable disengages from the spindle. NOTE: When you install Vector again, you must recalibrate the system. Replacing the Pedals - Garmin Vector 2S | Owners Manual - Page 9
™ Specifications Power source Operating temperature range Radio frequency/protocol Transmission range USB From 14° to 122°F (from -10° to 50°C) 2.4 GHz ANT+ wireless communications protocol Approximately 16.4 ft. (5 m) Battery Information Vector monitors the battery level of both pedal pods and - Garmin Vector 2S | Owners Manual - Page 10
making sure the arrow points to locked. 8 Wait 10 seconds. After you replace the pedal pod battery, you must set the installation angle on your Edge (Setting the Installation Angle, page 3). Other Compatible Devices Edge 810 and 510 Device Instructions Pairing Vector with Your Edge 810 or 510 Device - Garmin Vector 2S | Owners Manual - Page 11
pods (Installing the Pedal, Upgrade Washer, and New Pedal Pod, page 8). 4 Check the LED status messages (Pedal Pod Status LED, page 2). 5 Update the Vector software to the latest version (Updating the Software Using Vector Updater, page 9). 6 Pair the Vector system to your Edge device and calibrate - Garmin Vector 2S | Owners Manual - Page 12
bike. 12Repeat steps 2 through 11 to install the right pedal and pedal pod. Registering Vector Help us better support you by completing our online registration today. • Go to www.garmin.com/vectorowner. • Keep the original sales receipt, or a photocopy, in a safe place. Power Data Fields NOTE: This - Garmin Vector 2S | Owners Manual - Page 13
is pedaling. Troubleshooting Updating the Software Using Vector Updater Before you can run the Vector Updater application, you must have a USB ANT Stick (included), an internet connection, and the pedal pods must have functioning batteries installed. 1 Go to www.garmin.com/vectorowner, and download - Garmin Vector 2S | Owners Manual - Page 14
the pedal pod or remove the pedal pod batteries during a software update. Performing a Static Torque Test NOTICE The static torque test is intended for advanced cyclists and installation experts. This test is not required under normal circumstances to achieve good results with the Vector system - Garmin Vector 2S | Owners Manual - Page 15
3, 6-8 E Edge 2, 6 F fēnix 6, 7 Forerunner 7 G Garmin Connect 3, 4 H history 3 sending to computer 3, 4 I installing 1, 2, 8, 9 M memory 3 P pairing 2, 6, 7, 9 pedal pods 1, 2, 4, 5, 7, 8 pedals 1-4, 7, 8 platform center offset 3 power 3 power (force), meters 3 power phase 3 product registration - Garmin Vector 2S | Owners Manual - Page 16
www.garmin.com/support +43 (0) 820 220230 + 32 2 672 52 ) 001-855-792-7671 +47 815 69 555 (+35) 1214 447 460 0861 GARMIN (427 646) +27 (0)11 251 9999 + 46 7744 52020 0808 238 0000 +44 (0) 870 8501242 913-397 REGISTERED No: ER38145/15 DEALER No: © 2015 Garmin Ltd. or its subsidiaries TA-2013/403
-
 1
1 -
 2
2 -
 3
3 -
 4
4 -
 5
5 -
 6
6 -
 7
7 -
8
-
9
-
10
-
11
-
12
-
13
-
14
-
15
-
16
 |
 |
Vector
™
2 and Vector 2S
Owner’s Manual
June 2015
Printed in Taiwan
190-01867-00_0B