Garmin Vector 2S Owners Manual - Page 5
Introduction, Thank You, Getting Started, Tools Included, Installing the Vector Components - power pedal system
 |
View all Garmin Vector 2S manuals
Add to My Manuals
Save this manual to your list of manuals |
Page 5 highlights
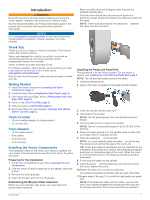
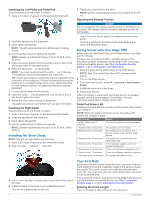
Introduction WARNING Read all instructions carefully before installing and using the Vector system. Improper use could result in serious injury. See the Important Safety and Product Information guide in the product box for product warnings and other important information. NOTICE Go to www.garmin.com/vectorowner for the latest information including bike compatibility, software updates, and video tutorials. Move your bike chain to the largest chain ring and the smallest cassette gear. The bike chain should be in the outermost position to determine proper clearance between the pedal pod cable and the chain. NOTE: There must be at least 5 mm clearance between À the chain and the crank arm. Thank You Thank you for your Vector or Vector S purchase. This manual covers both Vector systems. Vector was designed for cyclists, by cyclists, to provide an outstanding experience of owning a precision power measurement system for your bike. Vector is simple, accurate, and easy to use. For software updates, video tutorials, and everything you need to get years of service out of your Vector, go to www.garmin.com/vectorowner. Now it's time to put the power under your feet and get out there and ride. Getting Started 1 Install the Vector components (Installing the Vector Components, page 1). 2 Install the shoe cleats (Installing the Shoe Cleats, page 2). 3 Pair Vector with your Edge® device (Paring Vector with Your Edge 1000, page 2). 4 Go for a ride (Your First Ride, page 2). 5 View your history (Vector Data, page 3). 6 Send your history to your computer (Sending Your Ride to Garmin Connect, page 3). Tools Included • 15 mm crowfoot adapter for torque wrench • 2.5 mm hex key Tools Needed • 15 mm pedal wrench • Bike grease • 3 mm hex key • 4 mm hex key Installing the Vector Components The installation steps for the Vector and Vector S systems are very similar. Procedures that are specific to the Vector S system are noted. Preparing for the Installation 1 Confirm the compatibility of your bike at www.garmin.com /vectorowner. 2 Find the sensor ID that is engraved on the spindle, and write it down. 3 Remove the existing pedals. 4 Clean the threads, and remove old grease. Determining the Bicycle Chain Clearance Before you can install the right pedal, you must determine bicycle chain clearance. Installing the Pedal and Pedal Pod This procedure is for the Vector system. For the Vector S system, see Installing the Left Pedal and Pedal Pod, page 2. NOTE: The left and right pedal pods are the same. 1 Install the left pedal first. 2 Apply a thin layer of grease on the pedal spindle threads . À 3 Insert the spindle into the crank arm . Á 4 Hand tighten the spindle. NOTE: The left pedal spindle has a left-handed (reverse) thread. 5 Use the pedal wrench to tighten the spindle. NOTE: Garmin® recommends torque of 25 to 30 lbf-ft. (34 to 40 N-m). 6 Clean all excess grease from the spindle using a clean cloth and soapy water or isopropyl alcohol. 7 Place the pedal pod on the spindle. Â NOTE: You must carefully bend the cable out of the way. Ã The pedal pod should be flat against the crank arm. TIP: Power and cadence calculations are not impacted by the orientation of the pedal pod. Garmin recommends placing the pedal pod on the leading edge of the crank. When the crank is in the forward position, the pedal pod should be pointing downward. 8 Firmly plug the cable into the spindle. 9 Insert the screw into the pedal pod, and use the 2.5 mm Ä hex key to tighten the screw. 10Rotate the crank arm to check for clearance. The pedal pod should not interfere with any part of the bike. 11Repeat steps 2 through 10 to install the right pedal and pedal pod. NOTE: If the pedal pod cable rubs the chain, you can add one or two washers between the spindle and the crank arm to increase clearance. Do not use more than two washers. Introduction 1
-
 1
1 -
 2
2 -
 3
3 -
 4
4 -
 5
5 -
 6
6 -
 7
7 -
 8
8 -
 9
9 -
 10
10 -
 11
11 -
12
-
13
-
14
-
15
-
16
 |
 |
