Garmin Vector 2S Owners Manual - Page 6
Installing the Left Pedal and Pedal Pod, Installing the Right Pedal, Installing the Shoe Cleats - installation
 |
View all Garmin Vector 2S manuals
Add to My Manuals
Save this manual to your list of manuals |
Page 6 highlights
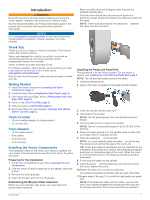
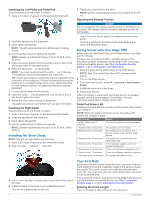
Installing the Left Pedal and Pedal Pod This procedure is for the Vector S system. 1 Apply a thin layer of grease on the pedal spindle threads . À 2 Insert the spindle into the crank arm . Á 3 Hand tighten the spindle. NOTE: The left pedal spindle has a left-handed (reverse) thread. 4 Use the pedal wrench to tighten the spindle. NOTE: Garmin recommends torque of 25 to 30 lbf-ft. (34 to 40 N-m). 5 Clean all excess grease from the spindle using a clean cloth and soapy water or isopropyl alcohol. 6 Place the pedal pod on the spindle. Â NOTE: You must carefully bend the cable out of the way. Ã The pedal pod should be flat against the crank arm. TIP: Power and cadence calculations are not impacted by the orientation of the pedal pod. Garmin recommends placing the pedal pod on the leading edge of the crank. When the crank is in the forward position, the pedal pod should be pointing downward. 7 Firmly plug the cable into the spindle. 8 Insert the screw into the pedal pod, and use the 2.5 mm Ä hex key to tighten the screw. 9 Rotate the crank arm to check for clearance. The pedal pod should not interfere with any part of the bike. Installing the Right Pedal This procedure is for the Vector S system. 1 Apply a thin layer of grease on the pedal spindle threads. 2 Insert the spindle into the crank arm. 3 Hand tighten the spindle. 4 Use the pedal wrench to tighten the spindle. NOTE: Garmin recommends torque of 25 to 30 lbf-ft. (34 to 40 N-m). Installing the Shoe Cleats NOTE: The left and right cleats are the same. 1 Apply a thin layer of grease on the cleat bolt threads. 2 Align the cleat , washers , and bolts . À Á Â 5 Tighten the cleat firmly to the shoe. NOTE: Garmin recommends torque of 4 to 6 lbf-ft. (5 to 8 Nm). Adjusting the Release Tension NOTICE Do not overtighten the release tension screw on the bottom of the pedal. The release tension should be adjusted equally for both pedals. Use a 3 mm hex key to adjust the release tension of each pedal. There is a window on the back of the pedal binding that shows the allowable range. Paring Vector with Your Edge 1000 Before you can view Vector data on the Edge device, you must pair the devices. Pairing is the connecting of ANT+® wireless sensors. This procedure contains instructions for the Edge 1000. If you have another compatible device, see Other Compatible Devices, page 6, or go to www.garmin.com/vectorowner. 1 Bring the Edge device within range (3 m) of the sensor. NOTE: Stay 10 m away from other ANT+ sensors while pairing. 2 Turn on the Edge device. 3 From the home screen, select > Sensors > Add Sensor > Power. 4 Rotate the crank arm a few times. 5 Select your sensor. When the sensor is paired with your Edge device, a message appears, and the sensor status is Connected. You can customize a data field to display Vector data. Pedal Pod Status LED Multiple green LED flashes indicate a system issue that requires your attention. NOTE: When the pedal pod battery is low, the status LED flashes red, instead of green. LED Activity 1 green flash every 10 seconds. 2 flashes every 10 seconds. 3 flashes every 10 seconds. 4 flashes every 10 seconds. 5 flashes every 10 seconds. 6 flashes every 10 seconds. 7 flashes every 10 seconds. 1 red flash every 10 seconds. Status The Vector system is working properly. The pedal is not connected. The pedal pod is connected, but it cannot communicate with the Edge device. The pedal pod is searching for the other pedal pod. The installation angle is not set or cannot be detected. There is a hardware installation error. There is a software update in progress. The pedal pod battery is low. 3 Use a 4 mm hex key to loosely attach each bolt to the sole of the shoe. 4 Adjust the cleat to the shoe in your preferred position. This can be adjusted after a trial ride. 2 Your First Ride Before you ride with Vector for the first time, you must enter the crank length and set the installation angle of the sensors inside the pedals. The Vector system automatically calibrates after each ride. You must also enter the crank length when you move Vector to another bike. This procedure contains instructions for the Edge 1000 device. If you have another compatible device, see Other Compatible Devices, page 6, or go to www.garmin.com/vectorowner. Entering the Crank Length The crank length is often printed on the crank arm. Introduction
-
 1
1 -
 2
2 -
 3
3 -
 4
4 -
 5
5 -
 6
6 -
 7
7 -
 8
8 -
 9
9 -
 10
10 -
 11
11 -
 12
12 -
13
-
14
-
15
-
16
 |
 |
