Garmin Vector 2S Owners Manual - Page 10
Other Compatible Devices, Edge 810 and 510 Device Instructions - power meter pedals
 |
View all Garmin Vector 2S manuals
Add to My Manuals
Save this manual to your list of manuals |
Page 10 highlights
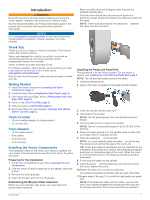
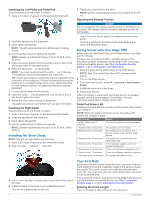
7 Use a coin to twist the cover clockwise back into place, making sure the arrow points to locked. 8 Wait 10 seconds. After you replace the pedal pod battery, you must set the installation angle on your Edge (Setting the Installation Angle, page 3). Other Compatible Devices Edge 810 and 510 Device Instructions Pairing Vector with Your Edge 810 or 510 Device 1 Bring the Edge device within range (3 m) of the sensor. NOTE: Stay 10 m away from other ANT+ sensors while pairing. 2 Turn on the Edge device. 3 From the home screen, select > Bike Profiles. 4 Select a profile. 5 Select . 6 Enable the sensor, and select Search. 7 Rotate the crank arm a few times. When the sensor is paired with your Edge device, the sensor status is Connected. You can customize a data field to display Vector data. Entering the Crank Length The crank length is often printed on the crank arm. 1 Rotate the pedals a few times in order to activate Vector. 2 From the home screen, select > Bike Profiles. 3 Select a profile. 4 Select Crank Length > Manual. 5 Enter the crank length, and select . Edge 800 Device Instructions Pairing Vector with the Edge 800 Device 1 Bring the Edge device within range (3 m) of the sensor. NOTE: Stay 10 m away from other ANT+ sensors while pairing. 2 Turn on the Edge device. 3 Select MENU > > Bike Settings > Bike Profiles. 4 Select a bike. 5 Select ANT + Power > Power Meter > Yes. 6 Rotate the crank arm a few times. 7 Select . When the sensor is paired with your Edge device, a message appears, and appears solid on the status page. You can customize a data field to display Vector data. Entering the Crank Length The crank length is often printed on the crank arm. 1 Rotate the pedals a few times in order to activate Vector. 2 Select MENU > > Bike Settings > Bike Profiles. 3 Select a profile. 4 Select Bike Details > Crank Length > Custom. 5 Enter the crank length, and select . Edge 500 Device Instructions Pairing Vector with the Edge 500 Device 1 Bring the Edge device within range (3 m) of the sensor. NOTE: Stay 10 m away from other ANT+ sensors while pairing. 2 Turn on the Edge device. 3 Hold MENU. 4 Select Settings > Bike Settings. 5 Select a bike. 6 Select ANT + Power. 7 Enable the sensor, and select Search. 8 Rotate the crank arm a few times. When the sensor is paired with your Edge device, a message appears, and appears solid on the main menu. You can customize a data field to display Vector data. Entering the Crank Length The crank length is often printed on the crank arm. 1 Rotate the pedals a few times in order to activate Vector. 2 Hold MENU. 3 Select Settings > Bike Settings. 4 Select a bike. 5 Select Bike Details > More > Crank Length > Manual. 6 Enter the crank length. Customizing the Data Fields This procedure contains instructions for the Edge 500 device. 1 Hold MENU. 2 Select Settings > Bike Settings > Data Fields. 3 Select a page. 4 Select the number of data fields to appear on the page. 5 Select a data field. fēnix® 3 Device Instructions Pairing Vector with the fēnix 3 Device 1 Bring the fēnix device within 3 m of the sensor. NOTE: Stay 10 m away from other ANT+ sensors while pairing. 2 Hold UP. 3 Select Settings > Sensors > Add New > Power. 4 Rotate the crank arm a few times. 5 Select your sensor. When the sensor is paired with your fēnix device, the sensor status changes from Searching to Connected. Customizing the Data Fields 1 Hold UP. 2 Select Settings > Apps > Bike > Data Screens. 3 Select a screen. 4 Select a data field to change it. Entering the Crank Length The crank length is often printed on the crank arm. 1 Rotate the pedals a few times in order to activate Vector. 2 Hold UP. 3 Select Settings > Sensors. 4 Select your sensor. 5 Select Crank Length. 6 Enter the crank length, and select . 6 Other Compatible Devices
-
 1
1 -
2
-
3
-
4
-
 5
5 -
 6
6 -
 7
7 -
 8
8 -
 9
9 -
 10
10 -
 11
11 -
 12
12 -
 13
13 -
 14
14 -
 15
15 -
16
 |
 |
