GE CGS980SEMSS Use and Care Manual - Page 35
Control Panel and Knobs, Cooktop, GEAppliances.com
 |
UPC - 084691163626
View all GE CGS980SEMSS manuals
Add to My Manuals
Save this manual to your list of manuals |
Page 35 highlights
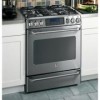
Safety Instructions Operating Instructions GEAppliances.com Cooktop Surface To avoid damaging the stainless steel surface of the cooktop and to prevent it from becoming dull, clean up spills right away. Foods with a lot of acid (tomatoes, sauerkraut, fruit juices, etc.) or foods with high sugar content could cause a dull spot if allowed to set. When the surface has cooled, wash and rinse. For other spills such as fat spatterings, etc., wash with soap and water once the surface has cooled. Then rinse and polish with a dry cloth. NOTE: Do not store flammable materials in an oven, drawer or near the cooktop. Do not store or use combustible materials, gasoline or other flammable vapors and liquids in the vicinity of this or any other appliance. NOTE: Do not lift the cooktop. Lifting the cooktop can lead to damage and improper operation of the range. Vent appearance and location vary. Oven Air Vents Never block the vents (air openings) of the range. They provide the air inlet and outlet that are necessary for the range to operate properly with correct combustion. Air openings are located at the rear of the cooktop, at the top and bottom of the oven door, and at the bottom of the range, under the lower cooking drawer. Upper Control Panel See the Gas/Control Lockout information in the Special features of your oven control section in this manual. Clean up splatters with a damp cloth. You may also use a glass cleaner. Remove heavier soil with warm soapy water. Do not use abrasives of any kind. Unlock the touch pads after cleaning. Installation Instructions Troubleshooting Tips Consumer Support Surface burner knob Lower Control Panel (Front Manifold Panel) and Knobs It's a good idea to wipe the control panel after each use of the oven. Use a damp cloth to clean or rinse. For cleaning, use mild soap and water or a 50/50 solution of vinegar and water. For rinsing, use clean water. Polish dry with a soft cloth. Do not use abrasive cleansers, strong liquid cleaners, plastic scouring pads or oven cleaners on the control panel-they will damage the finish. Do not try to bend knobs by pulling them up or down or by hanging a towel or other such loads. This can damage the gas valve shaft. The control knobs may be removed for easier cleaning. Make sure the knobs are in the OFF positions and pull them straight off the stems for cleaning. The knobs can be cleaned in a dishwasher or they may also be washed with soap and water. Make sure the insides of the knobs are dry before replacing. Replace the knobs in the OFF position to ensure proper placement. Metal parts can be cleaned with soap and water. Do not use steel wool, abrasives, ammonia, acids or commercial oven cleaners. Dry with a soft cloth. NOTE: The lower oven drawer control knob is not interchangeable with the surface burner knobs. Be sure to reinstall the lower oven drawer knob to the original location. The lower oven drawer knob may be identified by the increasing numbers from "WM" to "450." 35
-
 1
1 -
2
-
3
-
4
-
5
-
6
-
7
-
8
-
9
-
10
-
11
-
12
-
13
-
14
-
15
-
16
-
17
-
18
-
19
-
20
-
21
-
22
-
23
-
24
-
25
-
26
-
27
-
28
-
29
-
 30
30 -
 31
31 -
 32
32 -
 33
33 -
 34
34 -
 35
35 -
 36
36 -
 37
37 -
 38
38 -
 39
39 -
 40
40 -
41
-
42
-
43
-
44
-
45
-
46
-
47
-
48
-
49
-
50
-
51
-
52
-
53
-
54
-
55
-
56
-
57
-
58
-
59
-
60
 |
 |
