GE CSB9120SJSS Installation Instructions - Page 18
Assembly To Advantium Built-in Speedcook Oven
 |
View all GE CSB9120SJSS manuals
Add to My Manuals
Save this manual to your list of manuals |
Page 18 highlights
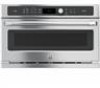
ASSEMBLY TO ADVANTIUM BUILT-IN SPEEDCOOK OVEN 1 REMOVE PACKAGING AND PARTS • Remove the drawer from the carton. • Remove all packing material and tape. • Open the drawer and remove any parts inside. • Locate parts. Side Supports (2) 3 ASSEMBLING THE OVEN TO DRAWER A Place storage drawer on a surface with the front of drawer hanging over the edge of the surface. Not placing the front edge of drawer over the edge of the surface may result in damage to the drawer since the front edge of drawer hangs below the bottom of drawer. B Place the oven on top of the storage drawer. Make sure that the back and sides of the oven align with the back and sides of drawer. Assembly Instructions Under-the-Counter (UTC) Mounting Bracket Screws (6 required, 2 extra) Color-Matched Screws (4 required, 1 extra) 2 UNDER-THE-COUNTER (UTC) MOUNTING BRACKET INSTALLATION NOTE: For UTC models PSB9120 and ZSC1201 only. A Open the accessory drawer so you have access to the top bracket. B Remove the three screws securing the top bracket. C Install the new UTC mounting bracket using the screws removed previously. NOTE: The bottom of the oven side flanges will sit directly in front of the top of the storage drawer side flanges. D Close the drawer and proceed with the installation. 18
-
 1
1 -
2
-
3
-
4
-
5
-
6
-
7
-
8
-
9
-
10
-
11
-
12
-
 13
13 -
 14
14 -
 15
15 -
 16
16 -
 17
17 -
 18
18 -
 19
19 -
 20
20
 |
 |
