GE DPVH880EJWW Owners Manual - Page 27
Before You Begin, Standard Rear Exhaust, Recommended Configuration, To Minimize Exhaust Blockage
 |
UPC - 084691169840
View all GE DPVH880EJWW manuals
Add to My Manuals
Save this manual to your list of manuals |
Page 27 highlights
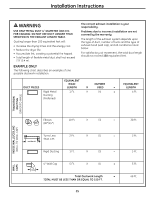
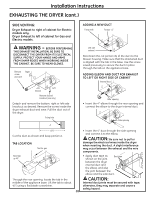
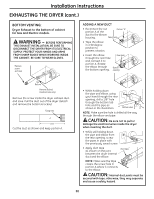
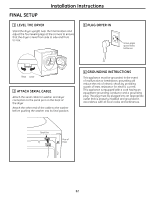
Installation Instructions BEFORE YOU BEGIN • Remove and discard existing plastic or metal foil duct and replace with UL-listed duct. • Remove any lint from the wall exhaust opening. Internal Duct Opening Wall Check that exhaust hood damper opens and closes freely. RECOMMENDED CONFIGURATION TO MINIMIZE EXHAUST BLOCKAGE Using duct elbows will prevent duct kinking and collapsing. Transition Ducting STANDARD REAR EXHAUST We recommend that you install your dryer before installing your washer. This will permit direct access for easier exhaust connection. Slide the end of the exhaust duct on the back of the dryer and secure with duct tape or a hose clamp. Duct NOTE: We strongly recommend using rigid metal exhaust duct. • For straight-line installation, connect the dryer exhaust to the wall, using duct tape. Wall Side Dryer Side 27
-
 1
1 -
2
-
3
-
4
-
5
-
6
-
7
-
8
-
9
-
10
-
11
-
12
-
13
-
14
-
15
-
16
-
17
-
18
-
19
-
20
-
21
-
 22
22 -
 23
23 -
 24
24 -
 25
25 -
 26
26 -
 27
27 -
 28
28 -
 29
29 -
 30
30 -
 31
31 -
 32
32 -
33
-
34
-
35
-
36
-
37
-
38
-
39
-
40
-
41
-
42
-
43
-
44
-
45
-
46
-
47
-
48
-
49
-
50
-
51
-
52
-
53
-
54
-
55
-
56
-
57
-
58
-
59
-
60
-
61
-
62
-
63
-
64
-
65
-
66
-
67
-
68
-
69
-
70
-
71
-
72
-
73
-
74
-
75
-
76
-
77
-
78
-
79
-
80
-
81
-
82
-
83
-
84
-
85
-
86
-
87
-
88
-
89
-
90
-
91
-
92
-
93
-
94
-
95
-
96
-
97
-
98
-
99
-
100
-
101
-
102
-
103
-
104
-
105
-
106
-
107
-
108
-
109
-
110
-
111
-
112
-
113
-
114
-
115
-
116
-
117
-
118
-
119
-
120
-
121
-
122
-
123
-
124
-
125
-
126
-
127
-
128
-
129
-
130
-
131
-
132
-
133
-
134
-
135
-
136
-
137
-
138
-
139
-
140
-
141
-
142
-
143
-
144
-
145
-
146
-
147
-
148
-
149
-
150
-
151
-
152
 |
 |
