GE DPVH880EJWW Owners Manual - Page 39
Reassemble Door Assembly, Reverse Front Panel Plug, Buttons And Strike Plate, Reinstall Door
 |
UPC - 084691169840
View all GE DPVH880EJWW manuals
Add to My Manuals
Save this manual to your list of manuals |
Page 39 highlights
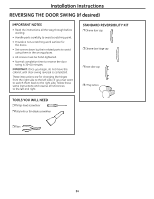
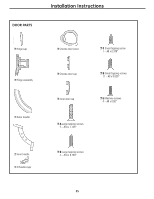
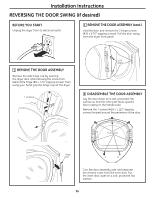
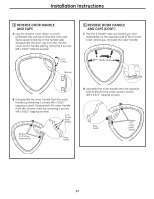
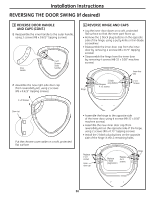
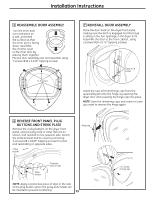
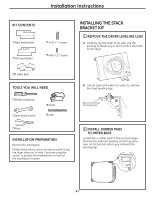
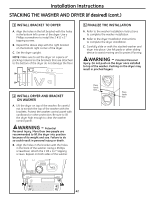
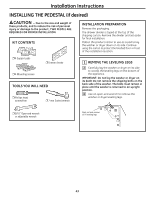
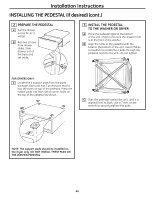
Installation Instructions 5 REASSEMBLE DOOR ASSEMBLY Turn the inner door over and place on a soft, protected flat surface so that the inner part is facing down. Assemble the chrome cover to the inner door by placing them together. Flip the door assembly over and assemble, using 7 screws (#10 x 1.125″ tapping screws). 7 x A Screws 7 REINSTALL DOOR ASSEMBLY Place the door back on the dryer front panel, making sure the latch is engaged and the hinge is sitting in the two openings in the dryer front. Assemble the door to the front cabinet, using 2 screws (#10 x 0.75″ tapping screws). Install 2 x B screws Install the new left-hand hinge cap (from the reversibility kit) onto the hinge, by opening the dryer door and screwing the hinge cap into place. NOTE: Save the remaining caps and covers in case you want to reverse the hinge again. 6 REVERSE FRONT PANEL PLUG BUTTONS AND STRIKE PLATE Remove the 2 plug buttons on the dryer front panel, using a putty knife or other flat tool as shown, and reinstall on the opposite side. Switch the strike bracket and its cover by removing 2 screws (#8 x 0.625″ tapping screws) for each and reinstalling on opposite sides. 2 Plug buttons Hinge cap Strike bracket Protective piece of tape NOTE: Apply a protective piece of tape to the side of the plug button where the putty knife blade will be inserted to prevent scratching. 39 1 x C Screw in hinge cap
-
 1
1 -
2
-
3
-
4
-
5
-
6
-
7
-
8
-
9
-
10
-
11
-
12
-
13
-
14
-
15
-
16
-
17
-
18
-
19
-
20
-
21
-
22
-
23
-
24
-
25
-
26
-
27
-
28
-
29
-
30
-
31
-
32
-
33
-
 34
34 -
 35
35 -
 36
36 -
 37
37 -
 38
38 -
 39
39 -
 40
40 -
 41
41 -
 42
42 -
 43
43 -
 44
44 -
45
-
46
-
47
-
48
-
49
-
50
-
51
-
52
-
53
-
54
-
55
-
56
-
57
-
58
-
59
-
60
-
61
-
62
-
63
-
64
-
65
-
66
-
67
-
68
-
69
-
70
-
71
-
72
-
73
-
74
-
75
-
76
-
77
-
78
-
79
-
80
-
81
-
82
-
83
-
84
-
85
-
86
-
87
-
88
-
89
-
90
-
91
-
92
-
93
-
94
-
95
-
96
-
97
-
98
-
99
-
100
-
101
-
102
-
103
-
104
-
105
-
106
-
107
-
108
-
109
-
110
-
111
-
112
-
113
-
114
-
115
-
116
-
117
-
118
-
119
-
120
-
121
-
122
-
123
-
124
-
125
-
126
-
127
-
128
-
129
-
130
-
131
-
132
-
133
-
134
-
135
-
136
-
137
-
138
-
139
-
140
-
141
-
142
-
143
-
144
-
145
-
146
-
147
-
148
-
149
-
150
-
151
-
152
 |
 |
