GE GTH21SCXSS Use and Care Manual - Page 15
Installation Instructions, ATTACH THE WATER VALVE, CONNECT THE WATER LINE, INSTALL WATER LINE CLAMP
 |
UPC - 084691176251
View all GE GTH21SCXSS manuals
Add to My Manuals
Save this manual to your list of manuals |
Page 15 highlights
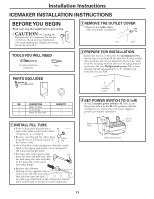
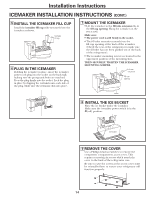
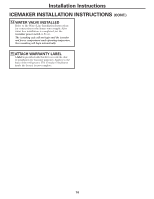
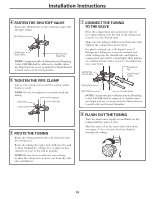
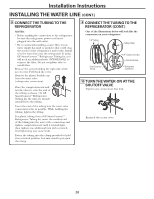
Installation Instructions 10 ATTACH THE WATER VALVE • Locate the female connector plug. Plug the female connector onto the male terminals on the water valve. Either wire can go on either terminal. Female connector Male terminals • Fasten the water valve to the cabinet by driving the Phillips head screw from the kit into the hole in the cabinet leg. Phillips head screw 12 CONNECT THE WATER LINE • Make sure there is enough plastic water line to extend from the water valve to well into the water tube inlet. Cut off any excess tubing. • Squeeze the ends of the hose clamp from the kit with pliers and slide the clamp over the water tube inlet. • While still squeezing the clamp, insert the plastic water line into the inlet as far as it will go (approximately 1″ [25 mm]). • Then slide the clamp downward to capture the plastic water line in place. • Make sure the fill tube is aimed down. Water tube inlet Hose clamp 11 INSTALL WATER LINE CLAMP • Attach the metal water line clamp (strain relief) to the refrigerator. Drive the screw from the kit through the clamp at the indent into the back of the cabinet. • The metal clamp is for the house water line (see the Water Line Installation Instructions). It is not to be used for the tubing from the water valve up to the icemaker. Screw Strain relief 13 ROUTE AND ATTACH THE PLASTIC WATER LINE • Fasten the plastic water line to the back of the cabinet with adhesive-backed fasteners, spacing the fasteners as shown to take up slack in the line. Adhesive-backed fasteners for plastic water line 15
-
 1
1 -
2
-
3
-
4
-
5
-
6
-
7
-
8
-
9
-
 10
10 -
 11
11 -
 12
12 -
 13
13 -
 14
14 -
 15
15 -
 16
16 -
 17
17 -
 18
18 -
 19
19 -
 20
20 -
21
-
22
-
23
-
24
-
25
-
26
-
27
-
28
-
29
-
30
-
31
-
32
-
33
-
34
-
35
-
36
-
37
-
38
-
39
-
40
-
41
-
42
-
43
-
44
-
45
-
46
-
47
-
48
-
49
-
50
-
51
-
52
-
53
-
54
-
55
-
56
-
57
-
58
-
59
-
60
-
61
-
62
-
63
-
64
-
65
-
66
-
67
-
68
-
69
-
70
-
71
-
72
-
73
-
74
-
75
-
76
-
77
-
78
-
79
-
80
-
81
-
82
-
83
-
84
-
85
-
86
-
87
-
88
-
89
-
90
-
91
-
92
-
93
-
94
-
95
-
96
 |
 |
