GE GTH21SCXSS Use and Care Manual - Page 18
Cont., What You Will Need, Shut Off The Main Water, Supply, Choose The Valve Location
 |
UPC - 084691176251
View all GE GTH21SCXSS manuals
Add to My Manuals
Save this manual to your list of manuals |
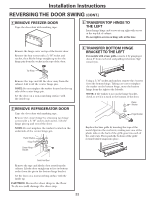
Page 18 highlights
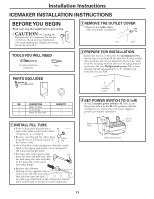
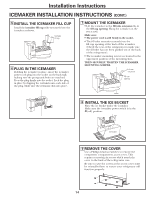
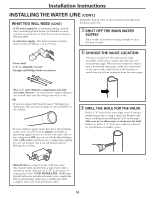
Installation Instructions INSTALLING THE WATER LINE (CONT.) WHAT YOU WILL NEED (CONT.) Install the shutoff valve on the nearest frequently used drinking water line. • A GE water supply kit (containing tubing, shutoff valve and fittings listed below) is available at extra cost from your dealer or from Parts and Accessories, 800.626.2002. • A cold water supply. The water pressure must be between 20 and 120 p.s.i. (1.4-8.1 bar). 1 SHUT OFF THE MAIN WATER SUPPLY Turn on the nearest faucet long enough to clear the line of water. • Power drill. • 1/2″ or adjustable wrench. • Straight and Phillips blade screwdriver. 2 CHOOSE THE VALVE LOCATION Choose a location for the valve that is easily accessible. It is best to connect into the side of a vertical water pipe. When it is necessary to connect into a horizontal water pipe, make the connection to the top or side, rather than at the bottom, to avoid drawing off any sediment from the water pipe. • Two 1/4 ″ outer diameter compression nuts and 2 ferrules (sleeves)-to connect the copper tubing to the shutoff valve and the refrigerator water valve. OR • If you are using a GE SmartConnect™ Refrigerator Tubing kit, the necessary fittings are preassembled to the tubing. • If your existing copper water line has a flared fitting at the end, you will need an adapter (available at plumbing supply stores) to connect the water line to the refrigerator OR you can cut off the flared fitting with a tube cutter and then use a compression fitting. Do not cut formed end from GE SmartConnect™ Refrigerator tubing. 3 DRILL THE HOLE FOR THE VALVE Drill a 1/4″ hole in the water pipe (even if using a self-piercing valve), using a sharp bit. Remove any burrs resulting from drilling the hole in the pipe. Take care not to allow water to drain into the drill. Failure to drill a 1/4″ hole may result in reduced ice production or smaller cubes. • Shutoff valve to connect to the cold water line. The shutoff valve should have a water inlet with a minimum inside diameter of 5/32″ at the point of connection to the COLD WATER LINE. Saddle-type shutoff valves are included in many water supply kits. Before purchasing, make sure a saddle-type valve complies with your local plumbing codes. 18
-
 1
1 -
2
-
3
-
4
-
5
-
6
-
7
-
8
-
9
-
10
-
11
-
12
-
 13
13 -
 14
14 -
 15
15 -
 16
16 -
 17
17 -
 18
18 -
 19
19 -
 20
20 -
 21
21 -
 22
22 -
 23
23 -
24
-
25
-
26
-
27
-
28
-
29
-
30
-
31
-
32
-
33
-
34
-
35
-
36
-
37
-
38
-
39
-
40
-
41
-
42
-
43
-
44
-
45
-
46
-
47
-
48
-
49
-
50
-
51
-
52
-
53
-
54
-
55
-
56
-
57
-
58
-
59
-
60
-
61
-
62
-
63
-
64
-
65
-
66
-
67
-
68
-
69
-
70
-
71
-
72
-
73
-
74
-
75
-
76
-
77
-
78
-
79
-
80
-
81
-
82
-
83
-
84
-
85
-
86
-
87
-
88
-
89
-
90
-
91
-
92
-
93
-
94
-
95
-
96
 |
 |
