GE GTH21SCXSS Use and Care Manual - Page 16
ATTACH WARRANTY LABEL, WATER VALVE INSTALLED, CONT., label, icemaker power switch
 |
UPC - 084691176251
View all GE GTH21SCXSS manuals
Add to My Manuals
Save this manual to your list of manuals |
Page 16 highlights
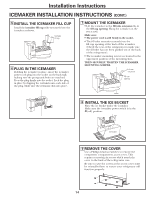
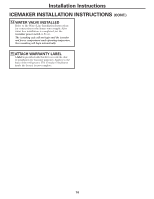
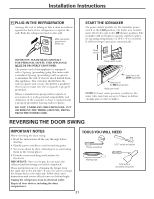
Installation Instructions ICEMAKER INSTALLATION INSTRUCTIONS (CONT.) 14 WATER VALVE INSTALLED Refer to the Water Line Installation Instructions for connection to the home water supply. After water line installation is completed, set the icemaker power switch to I (on). The icemaking cycle will not begin until the icemaker and freezer compartment reach operating temperature, then icemaking will begin automatically. 15 ATTACH WARRANTY LABEL A label is provided with this kit to record the date of installation for warranty purposes. Apply it to the back of the refrigerator. The icemaker installation inside the freezer is now complete. 16
-
 1
1 -
2
-
3
-
4
-
5
-
6
-
7
-
8
-
9
-
10
-
 11
11 -
 12
12 -
 13
13 -
 14
14 -
 15
15 -
 16
16 -
 17
17 -
 18
18 -
 19
19 -
 20
20 -
 21
21 -
22
-
23
-
24
-
25
-
26
-
27
-
28
-
29
-
30
-
31
-
32
-
33
-
34
-
35
-
36
-
37
-
38
-
39
-
40
-
41
-
42
-
43
-
44
-
45
-
46
-
47
-
48
-
49
-
50
-
51
-
52
-
53
-
54
-
55
-
56
-
57
-
58
-
59
-
60
-
61
-
62
-
63
-
64
-
65
-
66
-
67
-
68
-
69
-
70
-
71
-
72
-
73
-
74
-
75
-
76
-
77
-
78
-
79
-
80
-
81
-
82
-
83
-
84
-
85
-
86
-
87
-
88
-
89
-
90
-
91
-
92
-
93
-
94
-
95
-
96
 |
 |

16
Installation Instructions
15
ATTACH WARRANTY LABEL
A
label
is provided with this kit to record the date
of installation for warranty purposes. Apply it to the
back of the refrigerator. The icemaker installation
inside the freezer is now complete.
WATER VALVE INSTALLED
Refer to the Water Line Installation Instructions
for connection to the home water supply. After
water line installation is completed, set the
icemaker power switch
to
I
(on).
The icemaking cycle will not begin until the icemaker
and freezer compartment reach operating temperature,
then icemaking will begin automatically.
14
ICEMAKER INSTALLATION INSTRUCTIONS
(CONT.)