GE JVM1665SNSS Installation Instructions - Page 17
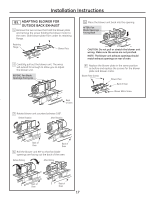
Adapting Blower for OutsideBack Exhaust, BEFORE: Fan Blade, Openings Facing Up, AFTER: Fan
 |
UPC - 084691187387
View all GE JVM1665SNSS manuals
Add to My Manuals
Save this manual to your list of manuals |
Page 17 highlights
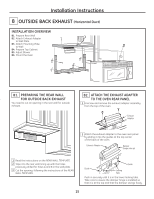
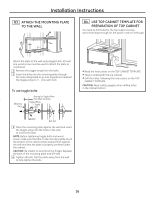
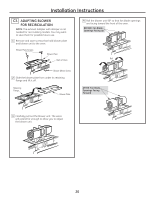
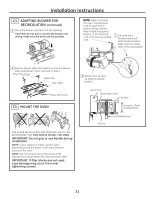
Installation Instructions B5. ADAPTING BLOWER FOR OUTSIDE BACK EXHAUST 1 Remove the two screws that hold the blower plate and remove the screw holding the blower motor to the oven. Slide blower plate from under its retaining flange. Retaining Flange Blower Plate 2 Carefully pull out the blower unit. The wires will extend far enough to allow you to adjust the blower unit. BEFORE: Fan Blade Openings Facing Up Back of Oven 5 Place the blower unit back into the opening. AFTER: Fan Blade Openings Facing Back CAUTION: Do not pull or stretch the blower unit wiring. Make sure the wires are not pinched. NOTE: The blower unit exhaust openings should match exhaust openings on rear of oven. 6 Replace the blower plate in the same position as before and replace the screws for the blower plate and blower motor. Blower Plate Screws Blower Plate Back of Oven Blower Motor Screw 3 Rotate blower unit counterclockwise 180°. Before Rotation After Rotation Back of Oven Back of Oven 4 Roll the blower unit 90° so that fan blade openings are facing out the back of the oven. Before Rolling After Rolling Back of Oven Back of Oven 17
-
 1
1 -
2
-
3
-
4
-
5
-
6
-
7
-
8
-
9
-
10
-
11
-
 12
12 -
 13
13 -
 14
14 -
 15
15 -
 16
16 -
 17
17 -
 18
18 -
 19
19 -
 20
20 -
 21
21 -
 22
22 -
23
-
24
-
25
-
26
-
27
-
28
-
29
-
30
-
31
-
32
-
33
-
34
-
35
-
36
-
37
-
38
-
39
-
40
-
41
-
42
-
43
-
44
-
45
-
46
-
47
-
48
 |
 |
