GE JVM1665SNSS Installation Instructions - Page 20
Adapting Blower forRecirculation, AFTER: Fan Blade, Openings Facing, Forward
 |
UPC - 084691187387
View all GE JVM1665SNSS manuals
Add to My Manuals
Save this manual to your list of manuals |
Page 20 highlights
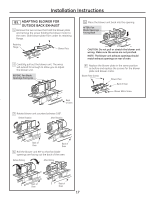
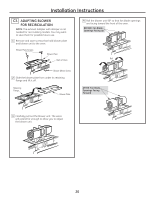
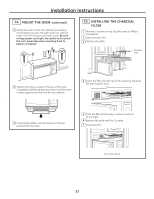
Installation Instructions C3. ADAPTING BLOWER FOR RECIRCULATION NOTE: The exhaust Adapter with damper is not needed for recirculating models. You may want to save them for possible future use. 1 Remove and save screws that hold blower plate and blower unit to the oven. Blower Plate Screws Blower Plate Back of Oven 4 Roll the blower unit 90° so that fan blade openings are facing toward the front of the oven. BEFORE: Fan Blade Openings Facing Up Roll Blower Motor Screw 2 Slide the blower plate from under its retaining flange and lift it off. Retaining Flange Blower Plate AFTER: Fan Blade Openings Facing Forward 3 Carefully pull out the blower unit. The wires will extend far enough to allow you to adjust the blower unit. 20
-
 1
1 -
2
-
3
-
4
-
5
-
6
-
7
-
8
-
9
-
10
-
11
-
12
-
13
-
14
-
 15
15 -
 16
16 -
 17
17 -
 18
18 -
 19
19 -
 20
20 -
 21
21 -
 22
22 -
 23
23 -
 24
24 -
 25
25 -
26
-
27
-
28
-
29
-
30
-
31
-
32
-
33
-
34
-
35
-
36
-
37
-
38
-
39
-
40
-
41
-
42
-
43
-
44
-
45
-
46
-
47
-
48
 |
 |

AFTER: Fan Blade
Openings Facing
Forward
3
2
4
ADAPTING BLOWER
FOR RECIRCULATION
C3.
20
NOTE:
The exhaust Adapter with damper is not
needed for recirculating models. You may want
to save them for possible future use.
Carefully pull out the blower unit. The wires
will extend far enough to allow you to adjust
the blower unit.
Roll the blower unit 90° so that fan blade openings
are facing toward the front of the oven.
Roll
Slide the blower plate from under its retaining
flange and lift it off.
Remove and save screws that hold blower plate
and blower unit to the oven.
Installation Instructions
BEFORE: Fan Blade
Openings Facing Up
1
Blower Plate
Retaining
Flange
Blower Plate
Back of Oven
Blower Plate Screws
Blower Motor Screw