GE WNRD2050GWC Installation Instructions
GE WNRD2050GWC Manual
 |
View all GE WNRD2050GWC manuals
Add to My Manuals
Save this manual to your list of manuals |
GE WNRD2050GWC manual content summary:
- GE WNRD2050GWC | Installation Instructions - Page 1
& Industrial Appliances Installation Instructions Commercial Clothes Washer If you have questions, call 800.GE.CARES (800.432.2737) or visit our website at: www.ge.com STOP BEFORE YOU BEGIN Read these instructions completely and carefully. IMPORTANT - Observe all governing codes and ordinances - GE WNRD2050GWC | Installation Instructions - Page 2
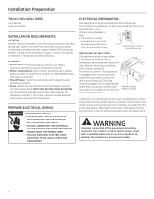
at faucet. • Water Temperature-Water heater should be set to deliver water at 120°F to 150°F (50°C to 66°C) IN THE WASHER when HOT wash is selected. • not meet the above specifications, call a licensed electrician. Insure Proper Ground Exists Before Use GROUNDING INSTRUCTIONS This appliance must - GE WNRD2050GWC | Installation Instructions - Page 3
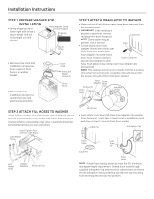
to installation location for remaining hose and electrical preparation. Inner Pack Parts and Water Hoses (2) Drain Hose STEP 3 ATTACH DRAIN HOSE TO WASHER • Make certain all installation items have been removed from the washer basket. • IMPORTANT: If the red plug is present in grommet, remove - GE WNRD2050GWC | Installation Instructions - Page 4
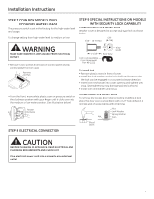
Instructions STEP 4 ADJUST LEVELING LEGS • Place level on front top edge of washer. • Adjust front leveling legs until washer is level from side-to-side. Remove level. • Tilt washer with Pliers C H Hot Water Hose Strainer Screen/ Rubber Washer COLD HOT Cold Water Hose Cable Tie Drain Hose - GE WNRD2050GWC | Installation Instructions - Page 5
7 COIN BOX MODELS ONLY ECONOMY WATER USAGE The pressure switch is set in the factory for the high water level and usage. To change setting from high water level to medium or low: STEP 9 SPECIAL INSTRUCTIONS ON MODELS WITH SECURITY LOCK CAPABILITY COVER SECURITY LOCK INSTALLATION Washer cover is - GE WNRD2050GWC | Installation Instructions - Page 6
; they should be replaced every 5 years. • Before discharging a washer, or removing it from service, remove the washer lid to prevent children from hiding inside. • Do not attempt to repair or replace any part of this appliance unless specifically recommended in these instructions or in published - GE WNRD2050GWC | Installation Instructions - Page 7
GE Consumer & Industrial Appliances Instructions d'installation Machine à laver commerciale Si vous avez des questions, appelez 800-GECARES ou visitez notre site Web : www.GEAppliances.com AVANT DE COMMENCER ARRÊT Lire ces consignes - GE WNRD2050GWC | Installation Instructions - Page 8
bois convient également, à condition que le support se conforme aux normes de l'administration FHA. Ne pas installer la machine à laver sur un tapis ou de la lectricien qualifié. Verifier que la machine est correctement mise à la terre avant l´utiliser 658-04UF INSTRUCTIONS DE MISE À LA TERRE Cet - GE WNRD2050GWC | Installation Instructions - Page 9
658-04BPiFèces et tuyaux à eau (2) Tuyau de vidange • Déplacer la machine à laver vers le lieu d'installation pour mettre en place les tuyaux et pr à travers l'agrafe anti-siphon fournie et l'attacher au dos de la machine, tel illustré. Installer l'agrafe anti-siphon en glissant l'agrafe supérieure - GE WNRD2050GWC | Installation Instructions - Page 10
placer l'attache de câble de façon à raccorder le coude au tuyau. Basculer la machine à laver vers l'avant de Mettre à niveau 10 à 15 cm pour régler laté et de vidange de traîner par terre ou de se coincer sous la machine. Garnitture de fil métallique Coude de vidange Tuyau ascendant • Placer le - GE WNRD2050GWC | Installation Instructions - Page 11
Préparation pour l'installation ÉTAPE 7 IUTILISATION ÉCONOMIQUE D'EAU UNIQUEMENT SUR LES MACHINES PAYANTES Le manostat est réglé à l'usine pour un niveau et un usage d'eau élevés. Pour changer le réglage du niveau élevé à un niveau moyen ou bas : ÉTAPE 9 DIRECTIVES PARTICULIÈRES POUR LES MODÈLES É - GE WNRD2050GWC | Installation Instructions - Page 12
LE Étudier cette liste après avoir installé la machine à laver ; ceci peut prévenir les frais d'un appel de service non couvert sous la garantie. APRÈS L'INSTALLATION, documentation et des instructions d'installation. RACCORDEMENT TYPE DES TUYAUX : Assemblage type de la machine à laver 658-04MF 12 - GE WNRD2050GWC | Installation Instructions - Page 13
, y compris le câble d'alimentation ou la fiche. LORSQUE LA MACHINE EST HORS USAGE • Fermer les robinets d'eau pour alléger la pression sur les • Avant de se débarrasser d'une machine ou de l'enlever de son emplacement pour le service, enlever le couvercle de la machine pour empêcher qu'un enfant ne - GE WNRD2050GWC | Installation Instructions - Page 14
para instalar esta lavadora comercial. El instalador es responsable por la instalación correcta. La garantía de productos electrodomésticos de GE no cubre fallas de productos debido a instalación incorrecta. PARA SU SEGURIDAD Lea y observe todas las PRECAUCIONES y ADVERTENCIAS que contiene estas - GE WNRD2050GWC | Installation Instructions - Page 15
externo de puesta a tierra (no incluido) que cumpla con los Instale la conexión a tierra (obtener localmente) códigos locales se puede instalar en la parte posterior de la lavadora con un tornillo para 658-04JS chapa metálica (no incluido), según se indica la ilustración. Se debe usar un - GE WNRD2050GWC | Installation Instructions - Page 16
el sitio donde se instalará para conectar las mangueras y el sistema eléctrico. 24 pulg. (61 cm) Corea o etiqueta 658-Pa0qu4etBe inSterior Partes y mangueras de agua (2) Manguera de desagüe PASO 3 INSTALE LA MANGUERA DE DESAGÜE • Asegúrese de sacar todos los Arandela componentes de instalaci - GE WNRD2050GWC | Installation Instructions - Page 17
Instrucciones para la instalación PASO 4 AJUSTE LAS PATAS NIVELADORAS • Ponga un nivel sobre el borde superior delantero de la lavadora. • Ajuste las patas niveladoras delanteras hasta nivelar lateralmente la lavadora. Retire el nivel. • Incline la lavadora hacia delante (pivotar sobre las patas - GE WNRD2050GWC | Installation Instructions - Page 18
leva disponible a través de Greenwald N°. -8-1222 Vista posterior 658-04RS Para instalar la cerradura: • Quite la guarnición de plástico que está en la parte delantera de la tapa. • Coloque la arandela en el eje de la cerradura e instálela de forma que se pueda accionar en sentido contrario a las - GE WNRD2050GWC | Installation Instructions - Page 19
las patas niveladoras delanteras (niveladas en fábrica a 1 pulgada (2,5 cm) según sea necesario. Verifique el nivelado lateral y entre el frente y la parte posterior. Incline la unidad hacia delante unas 4 pulgadas (10 cm) para ajustar las patas de autonivelado traseras. ■ Operación - Abra los - GE WNRD2050GWC | Installation Instructions - Page 20
de servicio una lavadora, se debe retirar su tapa para evitar que se oculten niños en su interior. • No reemplace ni repare ninguna parte de este artefacto a menos que se recomiende hacerlo en estas instrucciones o en un instructivo sobre reparación para usuarios que haya sido publicado, el cual
-
 1
1 -
 2
2 -
 3
3 -
 4
4 -
 5
5 -
 6
6 -
 7
7 -
8
-
9
-
10
-
11
-
12
-
13
-
14
-
15
-
16
-
17
-
18
-
19
-
20
 |
 |
GE Consumer & Industrial
Appliances
Installation
Instructions
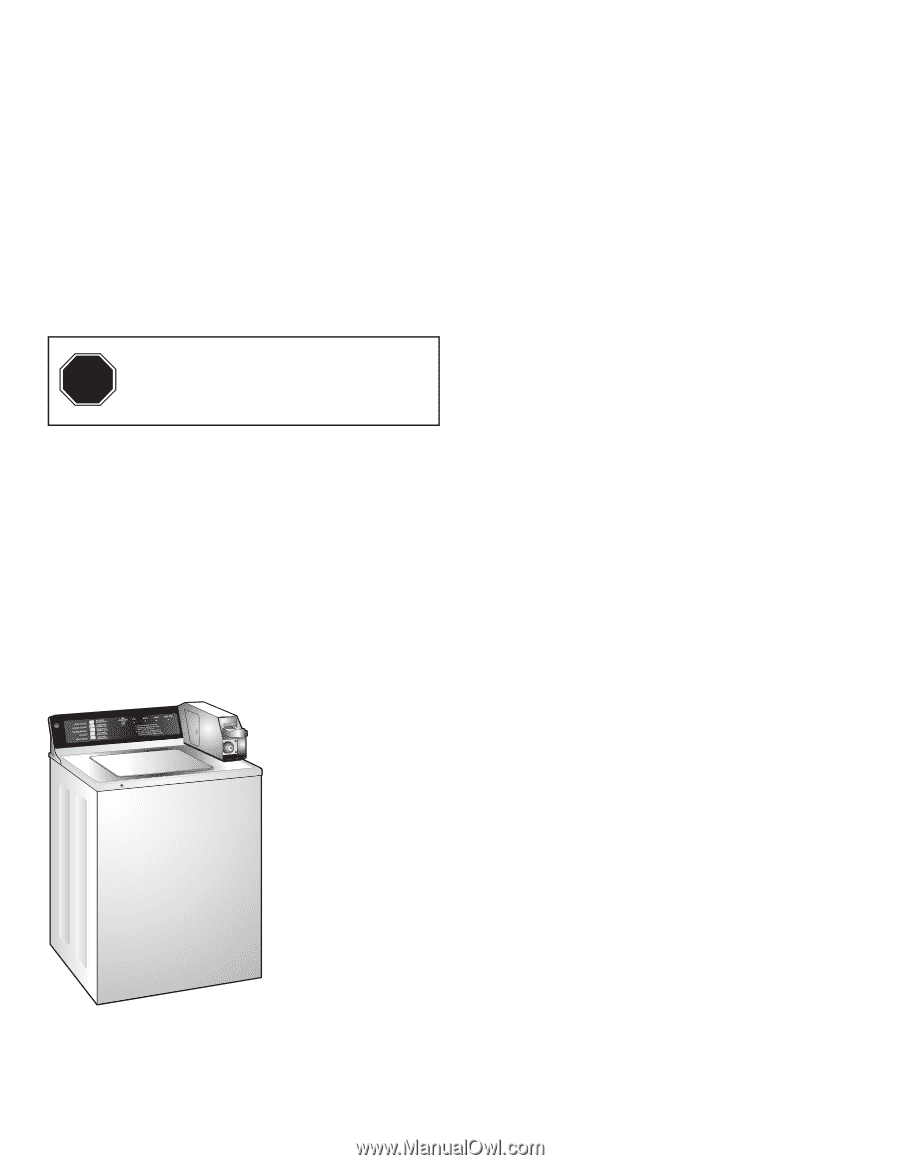
Commercial
Clothes Washer
If you have questions, call 800.GE.CARES (800.432.2737) or visit our website at: www.ge.com
IMPORTANT
– The washer MUST be installed to allow
for future removal from the enclosure if service is required.
If you received a damaged dishwasher, you should
immediately contact your dealer or builder.
Optional Accessories – See the Owner’s Manual for available
custom panel kits.
FOR YOUR SAFETY
Read and observe all CAUTIONS and WARNINGS
shown throughout these instructions. While performing
installations described in this booklet, gloves, safety glasses
or goggles should be worn.
READ CAREFULLY.
KEEP THESE INSTRUCTIONS.
IMPORTANT
– Observe all governing codes and
ordinances.
•
Note to Installer
– Be sure to leave these instructions for the
consumer’s and local inspector’s use.
•
Note to Consumer
– Keep these instructions with your
Owner’s Manual for future reference.
•
Skill Level
– Installation of this dishwasher requires
basic mechanical, electrical and plumbing skills.
Proper
installation is the responsibility of the installer. Product
failure due to improper installation is not covered under
the GE Appliance Warranty. See warranty information.
•
Completion Time – 1 to 3 Hours
. New installations require
more time than replacement installations.
BEFORE YOU BEGIN
Read these instructions completely and
carefully.
STOP
GE Consumer & Industrial
General Electric Company
Louisville, Kentucky 40225
ge.com
© 2006 General Electric Company
143B9310P035
Pub. No. 31-16545
ND
07D-2178 (4/07)
SPECIFICATIONS SUBJECT TO CHANGE WITHOUT NOTICE