Gigabyte GA-EX58-UD5 Manual - Page 98
Application Software
 |
UPC - 818313006837
View all Gigabyte GA-EX58-UD5 manuals
Add to My Manuals
Save this manual to your list of manuals |
Page 98 highlights
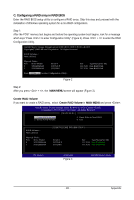
Smart Backup Config Apply RAID Config CMOS Setup Utility-Copyright (C) 1984-2008 Award Software Smart Backup Config [Performance (RAID 0)] [Press Enter] Item Help Menu Level === Disk Info === [Port] [Model] Port 0 WDCWD800JD-00JNA0 Port 1 WDCWD800JD-22LSA0 [Capacity] 80GB 80GB === RAID Info === [Level] [Capacity] [Member] Performance 0GB Move Enter: Select F5: Previous Values +/-/PU/PD: Value F10: Save F6: Fail-Safe Defaults Figure 2 ESC: Exit F1: General Help F7: Optimized Defaults Step 4: After configuring the SATA ports, you are ready to proceed with the installation of the operating system. You do not have to load the SA TA controller driver during the installation process of the operating system. Make sure to install the driver after the operating system is installed (using "Xpress Install" to install all drivers required for your motherboard is recommended) for the SA TA hard drives to work and be detected properly. Step 5: Then install the Smart Backup utility from the Application Software menu on the driver Autorun screen for monitoring the device/RAID status in the operating system (for more information, refer to section 5- 1-5, "Smart Backup Utility"). GA-EX58-UD5P/UD5 Motherboard - 98 -
-
 1
1 -
2
-
3
-
4
-
5
-
6
-
7
-
8
-
9
-
10
-
11
-
12
-
13
-
14
-
15
-
16
-
17
-
18
-
19
-
20
-
21
-
22
-
23
-
24
-
25
-
26
-
27
-
28
-
29
-
30
-
31
-
32
-
33
-
34
-
35
-
36
-
37
-
38
-
39
-
40
-
41
-
42
-
43
-
44
-
45
-
46
-
47
-
48
-
49
-
50
-
51
-
52
-
53
-
54
-
55
-
56
-
57
-
58
-
59
-
60
-
61
-
62
-
63
-
64
-
65
-
66
-
67
-
68
-
69
-
70
-
71
-
72
-
73
-
74
-
75
-
76
-
77
-
78
-
79
-
80
-
81
-
82
-
83
-
84
-
85
-
86
-
87
-
88
-
89
-
90
-
91
-
92
-
 93
93 -
 94
94 -
 95
95 -
 96
96 -
 97
97 -
 98
98 -
 99
99 -
 100
100 -
 101
101 -
 102
102 -
 103
103 -
104
-
105
-
106
-
107
-
108
-
109
-
110
-
111
-
112
-
113
-
114
-
115
-
116
-
117
-
118
-
119
-
120
-
121
-
122
-
123
-
124
-
125
-
126
-
127
-
128
 |
 |
