Gigabyte GA-Z87X-UD7 TH User Manual - Page 24
OC Buttons, OC PCIe switch PCIE_SW, CPU BCLK Down Button FREQ_DW
 |
View all Gigabyte GA-Z87X-UD7 TH manuals
Add to My Manuals
Save this manual to your list of manuals |
Page 24 highlights
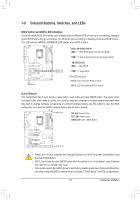
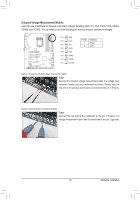
B B OC Buttons GIGABYTE's unique OC buttons help enthusiasts and overclockers not only get the most performance from their hardware, but also the absolute most enjoyable OC experience with features like overclocking the CPU in real-time, automatically loading the most optimized overclocking configuration for the processor and memory, and loading users' customized settings, etc. TAG TURBO TGR FREQ_DW FREQ_UP GEAR RATIO_DW RATIO_UP OC_IGNITION CPU Ratio Down Button (RATIO_DW): Lowers the CPU ratio. CPU Ratio Up Button (RATIO_UP): Raises the CPU ratio. CPU BCLK Down Button (FREQ_DW): Lowers the CPU base clock. CPU BCLK Up Button (FREQ_UP): Raises the CPU base clock. Gear Button Changes BCLK stepping to 0.1 MHz or 1 MHz. OC Turbobutton: Press this button to load the most optimized GIGABYTE overclocking configuration OC Tag button: for your processor and memory. This button allows users to load their customized settings (using the Save to Tag profile created in BIOS Setup) so you can apply your custom settings after clearing CMOS. _S S_ _ B _U _ B F_USB3 F S B_ B OC Trigger switch (TGR): This switch allows the overclockers to jump between low and extremely high frequencies in an instant. After remaining at a low frequency during system boot and OS optimization, the overclocker can then engage the Trigger Switch to instantly hit the target frequency, save their score submission, grab a screen shot, and watch the records tumble. UU 1 234 1 234 11 22 33 44 2 1: Target frequency set in BIOS Setup or other overclocking application. 1 1 12 23 34 4 1 12 23 34 4 2 2: Safe frequency (using the lowest CPU ratio, which may vary by CPU) 1 SS 33 BB SS SS SS OC Ignition button (ENPWR_BUTTON): The OC Ignition feature maintains power to your motherboard and connected components while the system is shut down. After pressing this button, be sure to press the power button to take effect. Before using the overclocking buttons, make sure to load the optimized defaults in BIOS Setup to return the BIOS settings to factory defaults. OC PCIe switch (PCIE_SW) This switch allows you to manually turn off specific PCI Express slot(s) (except for the PCIEX16_2 and PCI Express x1 slots) without physical removal. U __ 3 1 23 1 23 1 23 PCIE_SW PCIE_SW Slot Disabling PCIEX16_1 Disabling PCIEX8_1 Disable PCIEX16_3 Disabling PCIEX8_2 DIP Setting DIP 1 DIP 2 DIP 3 DIP 4 ON OFF OFF OFF OFF ON OFF OFF OFF OFF ON OFF OFF OFF OFF ON S 1 23 1 12 23 3 BB__ SS BB SS SS 1 1 SS 1 23 1 23 __SS 1 23 1 12 23 3 11 1 23 B SS S S 11 1 1 Hardware Installation - 24 -
-
 1
1 -
2
-
3
-
4
-
5
-
6
-
7
-
8
-
9
-
10
-
11
-
12
-
13
-
14
-
15
-
16
-
17
-
18
-
 19
19 -
 20
20 -
 21
21 -
 22
22 -
 23
23 -
 24
24 -
 25
25 -
 26
26 -
 27
27 -
 28
28 -
 29
29 -
30
-
31
-
32
-
33
-
34
-
35
-
36
-
37
-
38
-
39
-
40
-
41
-
42
-
43
-
44
-
45
-
46
-
47
-
48
-
49
-
50
-
51
-
52
-
53
-
54
-
55
-
56
-
57
-
58
-
59
-
60
-
61
-
62
-
63
-
64
-
65
-
66
-
67
-
68
-
69
-
70
-
71
-
72
-
73
-
74
-
75
-
76
-
77
-
78
-
79
-
80
-
81
-
82
-
83
-
84
-
85
-
86
-
87
-
88
-
89
-
90
-
91
-
92
-
93
-
94
-
95
-
96
-
97
-
98
-
99
-
100
-
101
-
102
-
103
-
104
-
105
-
106
-
107
-
108
-
109
-
110
-
111
-
112
-
113
-
114
-
115
-
116
-
117
-
118
-
119
-
120
-
121
-
122
-
123
-
124
-
125
-
126
-
127
-
128
 |
 |
