Gigabyte GSmart MW700 User Manual - GSmart MW700 English Version - Page 43
How to Use MMS
 |
View all Gigabyte GSmart MW700 manuals
Add to My Manuals
Save this manual to your list of manuals |
Page 43 highlights
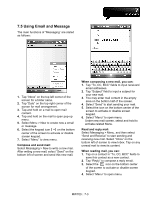
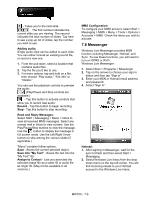
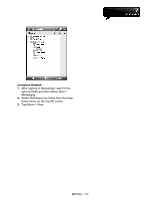
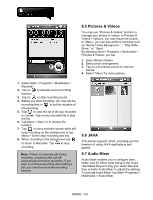
Note: To be able to use direct push, you need to have an exchange server. Microsoft Exchange Server 2003 also supports useful functions such as remote device wipe. To find out more on the benefit and usage of Microsoft Exchange server, please visit Microsoft's website, http://www.microsoft.com. 7.7 How to Use MMS Before using MMS, please go to Start > Messaging > MMS > Menu > Tools > Options > Accounts > MMS. Compose and Send MMS: Select "MMS" in "Messaging," then select "New" to write a new MMS. Tap "Send" on the bottom left of the screen to send the message. When composing a new message, you can: 1. Tap "To, CC, BCC" fields to input receivers' phone number. 2. Tap "Subject" field to input a subject for your new message. 3. Tap "Insert picture / video..." or "Insert audio..." to insert media attachments. 4. If you would like to choose a pre-made message template, tap Menu > Template > New From Template. 5. Tap "Insert text here" to input text in the message. 6. Tap on the icon to preview the message. The message size and the slide number are shown at the bottom status bar of the message. Note: You may not automatically be taken to a blank message. If you are instead taken to a page that displays pre-made templates, choose the template you want. If you would prefer to create a blank message next time, check the "Always choose custom" box. Adding a photo or video: You can add either a still image or a video clip to each individual slide. After you've tapped the area to add a photo or vide: 1. Tap and hold on a file to see the "Add to Message", "Large View", "File Info" and "Delete" options. 2. Tap "Select" to add the selected photo/video to the slide. Or tap "Cancel" to return to the previous screen. The following options are available: - Displays photos/videos as a file list. - Displays thumbnails (as shown here.) - Displays individual photos. - Lets you take a new picture.* - Lets you capture a new video.* *May not be available in all versions. Adding text: You can either enter in new text with the keyboard, or use "My Text" to add text to any slide. You can also insert an emotion icon or a favorite website link into your message. My Text contains previously saved words or phrases. ․Tap the My Text icon to see a list of pre-saved text messages. Tap the one you want, and then tap "Select" to add it into the message. ․Tap the smiling face icon to see a table of Emoticon icons. Tap the one you want to add it into the message. ․Tap the star icon to see a list of favorite links. Tap the one you want, and then tap "Select" to add it into the message. Menu commands: The following commands are available along the bottom of the Create screen: - Tap here to preview your message. - Takes you to the previous slide. MW700│7-5
-
 1
1 -
2
-
3
-
4
-
5
-
6
-
7
-
8
-
9
-
10
-
11
-
12
-
13
-
14
-
15
-
16
-
17
-
18
-
19
-
20
-
21
-
22
-
23
-
24
-
25
-
26
-
27
-
28
-
29
-
30
-
31
-
32
-
33
-
34
-
35
-
36
-
37
-
 38
38 -
 39
39 -
 40
40 -
 41
41 -
 42
42 -
 43
43 -
 44
44 -
 45
45 -
 46
46 -
 47
47 -
 48
48 -
49
-
50
-
51
-
52
-
53
-
54
-
55
-
56
-
57
-
58
-
59
-
60
-
61
-
62
-
63
-
64
 |
 |
