Gigabyte X299 AORUS Gaming 7 Pro RAID Setup Guide
Gigabyte X299 AORUS Gaming 7 Pro Manual
 |
View all Gigabyte X299 AORUS Gaming 7 Pro manuals
Add to My Manuals
Save this manual to your list of manuals |
Gigabyte X299 AORUS Gaming 7 Pro manual content summary:
- Gigabyte X299 AORUS Gaming 7 Pro | RAID Setup Guide - Page 1
Configuring a RAID Set Configuring SATA Controllers 2 Installing the RAID/AHCI Driver and Operating System 16 Installing an Intel® Optane™ Memory 19 - Gigabyte X299 AORUS Gaming 7 Pro | RAID Setup Guide - Page 2
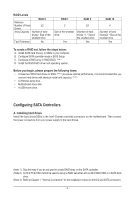
performance, it is recommended that you use two hard drives with identical model and capacity). (Note 3) •• A Windows setup disk. •• Motherboard driver disk. •• A USB thumb drive. Configuring SATA Controllers A. Installing hard drives Install the hard drives/SSDs in the Intel® Chipset controlled - Gigabyte X299 AORUS Gaming 7 Pro | RAID Setup Guide - Page 3
information. Finally, save the settings and exit BIOS Setup. The BIOS Setup menus described in this section may differ from the exact settings for your motherboard. The actual BIOS Setup menu options you will see shall depend on the - Gigabyte X299 AORUS Gaming 7 Pro | RAID Setup Guide - Page 4
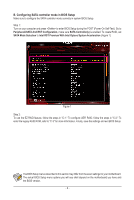
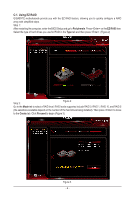
C-1. Using EZ RAID GIGABYTE motherboards provide you with the EZ RAID feature, allowing you Enter>. (Figure 2) Step 2: Figure 2 Go to the Mode tab to select a RAID level. RAID levels supported include RAID 0, RAID 1, RAID 10, and RAID 5 (the selections available depend on the number of the hard - Gigabyte X299 AORUS Gaming 7 Pro | RAID Setup Guide - Page 5
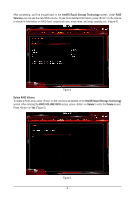
After completing, you'll be brought back to the Intel(R) Rapid Storage Technology screen. Under RAID Volumes you can see the new RAID volume. To see more detailed information, press on the volume to check for information on RAID level, stripe block size, array name, and array capacity, etc. - Gigabyte X299 AORUS Gaming 7 Pro | RAID Setup Guide - Page 6
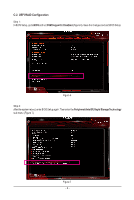
C-2. UEFI RAID Configuration Step 1: In BIOS Setup, go to BIOS and set CSM Support to Disabled (Figure 6). Save the changes and exit BIOS Setup. Figure 6 Step 2: After the system reboot, enter BIOS Setup again. Then enter the Peripherals\Intel(R) - Gigabyte X299 AORUS Gaming 7 Pro | RAID Setup Guide - Page 7
with 1~16 letters (letters cannot be special characters) under the Name item and press . Then, select a RAID level (Figure 8). RAID levels supported include RAID 0, RAID 1, RAID 10, and RAID 5 (the selections available depend on the number of the hard drives being installed). Next, use the - Gigabyte X299 AORUS Gaming 7 Pro | RAID Setup Guide - Page 8
Step 5: After setting the capacity, move to Create Volume and press to begin. (Figure 10) Figure 10 After completing, you'll be brought back to the Intel(R) Rapid Storage Technology screen. Under RAID Volumes you can see the new RAID volume. To see more detailed information, press on - Gigabyte X299 AORUS Gaming 7 Pro | RAID Setup Guide - Page 9
Delete RAID Volume To delete a RAID array, press on the volume to be deleted on the Intel(R) Rapid Storage Technology screen. After entering the RAID VOLUME INFO screen, press on Delete to enter the Delete screen. Press on Yes (Figure 12). Figure 12 - 9 - - Gigabyte X299 AORUS Gaming 7 Pro | RAID Setup Guide - Page 10
this step and proceed with the installation of Windows operating system for a non-RAID configuration. Step 1: In BIOS Setup, go to BIOS and set CSM Support to Enabled and Storage Boot Option Control to Legacy. Save the changes and exit BIOS Setup. After the POST memory test begins and before the - Gigabyte X299 AORUS Gaming 7 Pro | RAID Setup Guide - Page 11
with 1~16 letters (letters cannot be special characters) under the Name item and press . Then, select a RAID level (Figure 15). RAID levels supported include RAID 0, RAID 1, RAID 10, and RAID 5 (the selections available depend on the number of the hard drives being installed). Press - Gigabyte X299 AORUS Gaming 7 Pro | RAID Setup Guide - Page 12
Menu To exit the RAID BIOS utility, press or select 6. Exit in MAIN MENU. Now, you can proceed to install the SATA RAID/AHCI driver and operating system. - 12 - - Gigabyte X299 AORUS Gaming 7 Pro | RAID Setup Guide - Page 13
Recovery Volume Options Intel® Rapid Recover Technology provides data protection by allowing users to easily restore data and system operation using a designated recovery drive. With the Rapid Recovery Technology, which employs RAID 1 functionality, users can copy the data from the master drive to - Gigabyte X299 AORUS Gaming 7 Pro | RAID Setup Guide - Page 14
users to update data from the master drive to the recovery drive manually using the Intel® Rapid Storage Technology utility in the operating system. HELP ] Select a sync option: On Request: volume is updated manually Continuous: volume is updated automatically [hi]-Change [TAB]-Next [ESC]- - Gigabyte X299 AORUS Gaming 7 Pro | RAID Setup Guide - Page 15
are unable to run the Intel® IRST utility due to an application error or operating system issue, you will need to remove acceleration or manually enable synchronization (Maximized mode only) using this option in the RAID ROM utility. Steps: Select Acceleration Options in MAIN MENU and press - Gigabyte X299 AORUS Gaming 7 Pro | RAID Setup Guide - Page 16
during the Windows installation process. After the operating system is installed, we recommend that you install all required drivers from the motherboard driver disk using "Xpress Install" to ensure system performance and compatibility. If the operating system to be installed requires that you - Gigabyte X299 AORUS Gaming 7 Pro | RAID Setup Guide - Page 17
one. Restart your computer. •• Performing the Rebuild in the Operating System While in the operating system, make sure the chipset driver has been installed from the motherboard driver disk. Then launch the Intel® Rapid Storage Technology utility from the Start menu. Step 1: Go to the Manage menu - Gigabyte X299 AORUS Gaming 7 Pro | RAID Setup Guide - Page 18
VOLUMES OPTIONS menu, select Enable Only Recovery Disk to show the recovery drive in the operating system. Follow the on-screen instructions to complete and exit the RAID Configuration Utility. Intel(R) Rapid Storage Technology - Option ROM - 15.7.0.2925 Copyright (C) Intel Corporation. All Rights - Gigabyte X299 AORUS Gaming 7 Pro | RAID Setup Guide - Page 19
(Must be formatted for GPT partition.) 5. The motherboard driver disk B. Installation Guidelines B-1: Installation in AHCI mode driver disk into your optical drive. On the Xpress Install screen, select Intel(R) Optane(TM) Memory System Acceleration (Note) to install. Follow the on-screen instructions - Gigabyte X299 AORUS Gaming 7 Pro | RAID Setup Guide - Page 20
1: After system restarts, go to the BIOS Setup, make sure CSM Support under the BIOS menu is disabled. Step 2: Go to Peripherals\SATA And which one you are going to use. Step 5: Follow the on-screen instruction to continue the installation and then restart the system when completed. •• An Optane
-
 1
1 -
 2
2 -
 3
3 -
 4
4 -
 5
5 -
 6
6 -
 7
7 -
8
-
9
-
10
-
11
-
12
-
13
-
14
-
15
-
16
-
17
-
18
-
19
-
20
 |
 |

Configuring a RAID Set
Configuring SATA Controllers
........................................................................................
2
Installing the RAID/AHCI Driver and Operating System
.............................................
16
Installing an Intel
®
Optane
™
Memory
...........................................................................
19