Gigabyte X299 AORUS Gaming 7 Pro RAID Setup Guide - Page 15
Delete RAID Volume, MAIN MENU, DELETE, VOLUME MENU, Acceleration Options
 |
View all Gigabyte X299 AORUS Gaming 7 Pro manuals
Add to My Manuals
Save this manual to your list of manuals |
Page 15 highlights
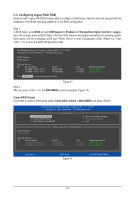
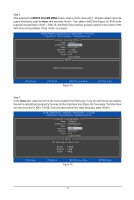
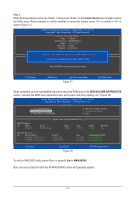
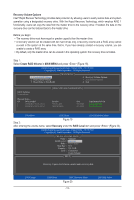
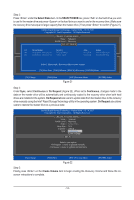
Delete RAID Volume To delete a RAID array, select Delete RAID Volume in MAIN MENU and press . In the DELETE VOLUME MENU section, use the up or down arrow key to select the array to be deleted and press . When prompted to confirm your selection (Figure 23), press to confirm or to abort. Name Volume0 Intel(R) Rapid Storage Technology - Option ROM - 15.7.0.2925 Copyright (C) Intel Corporation. All Rights Reserved. Level RAID0(Stripe) [ DELETE VOLUME MENU ] Drives 2 Capacity 1.8TB Status Normal Bootable Yes [ DELETE VOLUME VERIFICATION ] ALL DATA IN THE VOLUME WILL BE LOST! (This does not apply to Recovery volumes) Are you sure you wa[nHt tEoLdPel]ete "Volume0"? (Y/N) : Deleting a volume will reset the disks to non-RAID. WARNING: ALL DISK DATA WILL BE DELETED. (This does not apply to Recovery volumes) [hi]-Select [ESC]-Previous Menu Figure 23 [DEL]-Delete Volume Acceleration Options This option allows you to view the status of your accelerated drive/volume (Figure 24) created using the Intel® IRST utility. In case you are unable to run the Intel® IRST utility due to an application error or operating system issue, you will need to remove acceleration or manually enable synchronization (Maximized mode only) using this option in the RAID ROM utility. Steps: Select Acceleration Options in MAIN MENU and press . To remove the acceleration, select the accelerated drive/volume, press , and press to confirm. To synchronize data from the cache device to the accelerated drive/volume, press and press to confirm. Name DISK PORT 3 Intel(R) Rapid Storage Technology - Option ROM - 15.7.0.2925 Copyright (C) Intel Corporation. All Rights Reserved. [ ACCELERATION OPTIONS ] Type Non-RAID Disk Capacity 931.5GB Mode Enhanced Status In Sync [ HELP ] Press 's' to synchronize data from the cache device to the Accelerated Disk/Volume Press 'r' to remove the Disk/Volume Acceleration WARNING: IT IS RECOMMENDED THAT YOU PERFORM A SYNCHRONIZATION BEFORE REMOVING ACCELERATION [hi]-Select Figure 24 [ESC]- Previous Menu - 15 -
-
 1
1 -
2
-
3
-
4
-
5
-
6
-
7
-
8
-
9
-
 10
10 -
 11
11 -
 12
12 -
 13
13 -
 14
14 -
 15
15 -
 16
16 -
 17
17 -
 18
18 -
 19
19 -
 20
20
 |
 |
