Gigabyte X299 AORUS Gaming 7 Pro RAID Setup Guide - Page 4
C-1. Using EZ RAID
 |
View all Gigabyte X299 AORUS Gaming 7 Pro manuals
Add to My Manuals
Save this manual to your list of manuals |
Page 4 highlights
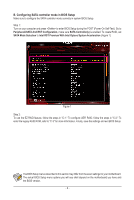
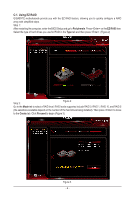
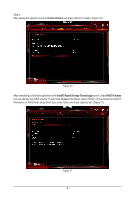
C-1. Using EZ RAID GIGABYTE motherboards provide you with the EZ RAID feature, allowing you to quickly configure a RAID array with simplified steps. Step 1: After restarting the computer, enter the BIOS Setup and go to Peripherals. Press on the EZ RAID item. Select the type of hard drives you use for RAID in the Type tab and then press . (Figure 2) Step 2: Figure 2 Go to the Mode tab to select a RAID level. RAID levels supported include RAID 0, RAID 1, RAID 10, and RAID 5 (the selections available depend on the number of the hard drives being installed). Then press to move to the Create tab. Click Proceed to begin (Figure 3). Figure 3 - 4 -
-
 1
1 -
 2
2 -
 3
3 -
 4
4 -
 5
5 -
 6
6 -
 7
7 -
 8
8 -
 9
9 -
 10
10 -
11
-
12
-
13
-
14
-
15
-
16
-
17
-
18
-
19
-
20
 |
 |

- 4 -
C-1. Using EZ RAID
GIGABYTE motherboards provide you with the EZ RAID feature, allowing you to quickly configure a RAID
array with simplified steps.
Step 1:
After restarting the computer, enter the BIOS Setup and go to
Peripherals
. Press <Enter> on the
EZ RAID
item.
Select the type of hard drives you use for RAID in the
Type
tab and then press <Enter>. (Figure 2)
Figure 2
Figure 3
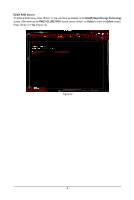
Step 2:
Go to the
Mode
tab to select a RAID level. RAID levels supported include RAID 0, RAID 1, RAID 10, and RAID 5
(the selections available depend on the number of the hard drives being installed). Then press <Enter> to move
to the
Create
tab. Click
Proceed
to begin (Figure 3).