Hannspree HT09 User Manual - Page 29
INPUT, Standard
 |
View all Hannspree HT09 manuals
Add to My Manuals
Save this manual to your list of manuals |
Page 29 highlights
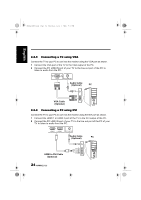
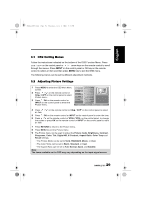
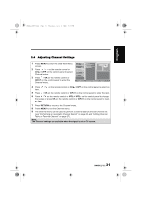
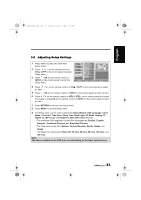
28US_LCDTV.book Page 29 Thursday, July 3, 2008 5:33 PM English 3.1 OSD Setting Menus Follow the instructions indicated on the bottom of the OSD Function Menu. Press CH / CH on the control panel or / arrow keys on the remote control to scroll through the menus. Press INPUT on the control panel or OK key on the remote control to select an item and then press MENU key to exit the OSD menu. The following menus can be set by different adjustment methods. 3.2 Adjusting Picture Settings 1 Press MENU to enter the OSD Main Menu screen. 2 Press / on the remote control or CHS / CHT on the control panel to select Picture menu. Picture Audio Channel V-CHIP Picture Mode Brightness Contrast Sharpness Color Tint Digital NR 3 Press / OK on the remote control or Setup INPUT on the control panel to enter the X-Contrast Aspect Ratio Next Page Picture menu. Move OK Enter Return Return Menu Exit 4 Press / an item. on the remote control or CHS / CHT on the control panel to select 5 Press / OK on the remote control or INPUT on the control panel to enter the item. 6 Press / on the remote control or VOL+/ VOL- on the control panel, to change the scales or press OK on the remote control or INPUT on the control panel to mark an item. 7 Press RETURN to return to the Picture menu. 8 Press MENU to exit the Picture menu. 9 The Picture menu can be used to adjust the Picture mode, Brightness, Contrast, Sharpness, Color, Tint, Digital NR, X-Contrast, Aspect Ratio, Color Temp and Recall settings. • The Picture Mode can be set to Vivid, Standard, Movie, or User. • The Color Temp can be set to Warm, Standard, or Cool. • The Aspect Ratio can be set to Full, Normal, Zoom, and Subtitle. Note: The items available on the OSD may vary depending on the input signal source. 29
-
 1
1 -
2
-
3
-
4
-
5
-
6
-
7
-
8
-
9
-
10
-
11
-
12
-
13
-
14
-
15
-
16
-
17
-
18
-
19
-
20
-
21
-
22
-
23
-
 24
24 -
 25
25 -
 26
26 -
 27
27 -
 28
28 -
 29
29 -
 30
30 -
 31
31 -
 32
32 -
 33
33 -
 34
34 -
35
-
36
-
37
-
38
-
39
-
40
-
41
-
42
-
43
-
44
-
45
-
46
-
47
-
48
-
49
-
50
-
51
-
52
 |
 |