Harman Kardon AVR 144 Owners Manual - Page 16
Connections - review
 |
View all Harman Kardon AVR 144 manuals
Add to My Manuals
Save this manual to your list of manuals |
Page 16 highlights
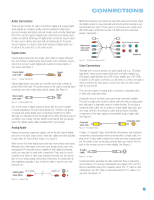
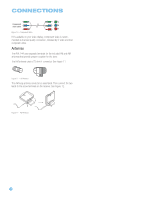
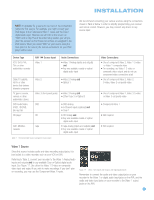
CONNECTIONS There are different types of audio and video connections used to connect the receiver to the speakers and video display, and to connect the source devices to the receiver. To make it easier to keep them all straight, the Consumer Electronics Association (CEA) has established a color-coding standard. Table 1 may be helpful to you as a reference while you set up your system. Audio Connections Front (FL/FR) Center (C) Surround (SL/SR) Subwoofer (SUB) Digital Audio Connections Coaxial Optical Video Connections Component Y Composite S-Video Table 1- Connection Color Guide Left Right Input Pb Pr Types of Cables This section will briefly review different types of cables and connections that you may use to set up your system. Speaker Connections Speaker cables carry an amplified signal from the receiver's speaker terminals to each loudspeaker. Speaker cables contain two wire conductors, or leads, inside plastic insulation. The two conductors are usually differentiated in some way, by using different colors, or stripes, or even by adding a ridge to the insulation. Sometimes the actual wires are different, one being copper red and the other silver. The differentiation is important because each speaker must be connected to the receiver's speaker-output terminals using two wires, one positive (+) and one negative (-). This is called speaker polarity. It's important to maintain the proper polarity for all speakers in the system. If some speakers have their negative terminals connected to the receiver's positive terminals, performance can suffer, especially for the low frequencies. Always connect the positive terminal on the loudspeaker, which is usually colored red, to the positive terminal on the receiver, which is colored as shown in the Connection Color Guide (Table 1). Similarly, always connect the black negative terminal on the speaker to the black negative terminal on the receiver. The AVR 144 uses binding-post speaker terminals that can accept banana plugs + or bare-wire cables. Banana plugs are simply plugged into the hole in the middle of the terminal cap. See Figure 1. Figure 1 - Binding-Post Speaker Terminals With Banana Plugs Bare wire cables are installed as follows (see Figure 2): 1. Unscrew the terminal cap until the pass-through hole in the collar is revealed. 2. Insert the bare end of the wire into the hole. 3. Screw the cap back into place until the wire is held snugly. 1 2 3 Figure 2 - Binding-Post Speaker Terminals With Bare Wires Subwoofer The subwoofer is a specialized type of loudspeaker that is usually connected in a different way. The subwoofer is used to play only the low frequencies (bass), which require much more power than the other speaker channels. In order to obtain the best results, most speaker manufacturers offer powered subwoofers, in which the speaker contains its own amplifier on board. Sometimes the subwoofer is connected to the receiver using the front left and right speaker outputs, and then the front left and right speakers are connected to terminals on the subwoofer. More often, a line-level (nonamplified) connection is made from the receiver's Subwoofer Output to a corresponding jack on the subwoofer, as shown in Figure 3. Although the subwoofer output looks similar to the analog audio jacks used for the various components, it is filtered and only allows the low frequencies to pass. Don't connect this output to your other devices. Although doing so won't cause any harm, performance will suffer. Figure 3 - Subwoofer Pre-out Subwoofer Connecting Source Devices to the AVR The AVR 144 is designed to process audio and video input signals, playing back the audio and displaying the video on a television or monitor connected to the AVR. These signals originate in what are known as "source devices," including your DVD player, CD player, DVR (digital video recorder) or other recorder, tape deck, game console, cable or satellite television box or MP3 player. Although the tuner is built into the AVR, it also counts as a source, even though no external connections are needed, other than the FM and AM antennas. Separate connections are required for the audio and video portions of the signal. The types of connections used depend upon what's available on the source device, and for video signals, the capabilities of your video display. 16
-
 1
1 -
2
-
3
-
4
-
5
-
6
-
7
-
8
-
9
-
10
-
 11
11 -
 12
12 -
 13
13 -
 14
14 -
 15
15 -
 16
16 -
 17
17 -
 18
18 -
 19
19 -
 20
20 -
 21
21 -
22
-
23
-
24
-
25
-
26
-
27
-
28
-
29
-
30
-
31
-
32
-
33
-
34
-
35
-
36
-
37
-
38
-
39
-
40
-
41
-
42
-
43
-
44
-
45
-
46
-
47
-
48
-
49
-
50
-
51
-
52
-
53
-
54
-
55
-
56
-
57
-
58
-
59
-
60
-
61
-
62
-
63
-
64
 |
 |
