Harman Kardon AVR 144 Owners Manual - Page 21
Video 1 Source
 |
View all Harman Kardon AVR 144 manuals
Add to My Manuals
Save this manual to your list of manuals |
Page 21 highlights
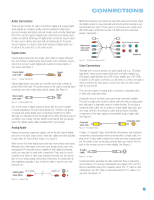
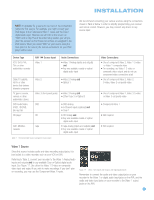
INSTALLATION NOTE: It's possible for a source to use none of the connections named for that source. For example, you might connect your DVD player to the Component Video 1 inputs and the Coax 1 digital audio input. However, we will refer to this source as "DVD", and in Step Five of the Initial Setup section you will program the receiver so that these connections are assigned to the DVD source. When you select "DVD" as your source using the front panel or the remote, the correct connections for your DVD player will be used. We recommend connecting your various sources using the connections shown in Table 2 below in order to simplify programming your receiver and remote control. However, you may connect any device to any source input. Device Type VCR, DVR, PVR, TiVo or other audio/video recorder AVR 144 Source Input Video 1 Audio Connections • Video 1 Analog (inputs and outputs) and • Any one available coaxial or optical digital audio input Cable TV, satellite, HDTV or other device that delivers television programs TV, game console, camera or other audio/video device DVD Audio/Video, SACD, HD-DVD, Blu-ray Disc CD player CDR, MiniDisc, cassette Video 2 • Video 2 Analog and • Optical 1 Video 3 (front-panel jacks) • Video 3 Analog and • Either Coax 3 or Optical 3 DVD • DVD Analog • 6-Channel inputs (optional) and • Coax 1 CD • CD Analog and • Any one available coaxial or optical digital audio input Tape • Tape Analog (inputs and outputs) and • Any one available coaxial or optical digital audio input Table 2 - Recommended Source Component Connections Video Connections • One of component Video 2, Video 1 S-video or Video 1 composite video • For recording, use Video 1 S-video or composite video output, and do not use component video connections at all • One of component Video 2, Video 2 S-video, Video 2 composite video • One of component Video 2, Video 3 S-video or Video 3 composite video • Component Video 1 • Not required • Not required Video 1 Source Since this source includes audio and video recording output jacks, it is best suited to a video recorder, such as your VCR or DVR. Referring to Table 2, connect your recorder to the Video 1 Analog Audio inputs and outputs and to any available Coax or Optical digital audio input. See Figure 17. Use either the Video 1 S-video or composite video input and output if you wish to make recordings. If you don't plan on recording, you may use the Component Video 2 inputs. Figure 17 - Video 1 A/V Inputs and Outputs, and Digital Audio Inputs Remember to connect the audio and video output jacks on your recorder to the Video 1 or digital audio input jacks on the AVR, and the audio and video input jacks on your recorder to the Video 1 output jacks on the AVR. 21
-
 1
1 -
2
-
3
-
4
-
5
-
6
-
7
-
8
-
9
-
10
-
11
-
12
-
13
-
14
-
15
-
 16
16 -
 17
17 -
 18
18 -
 19
19 -
 20
20 -
 21
21 -
 22
22 -
 23
23 -
 24
24 -
 25
25 -
 26
26 -
27
-
28
-
29
-
30
-
31
-
32
-
33
-
34
-
35
-
36
-
37
-
38
-
39
-
40
-
41
-
42
-
43
-
44
-
45
-
46
-
47
-
48
-
49
-
50
-
51
-
52
-
53
-
54
-
55
-
56
-
57
-
58
-
59
-
60
-
61
-
62
-
63
-
64
 |
 |