Harman Kardon AVR 144 Owners Manual - Page 25
Step Nine - Turn On the AVR 144
 |
View all Harman Kardon AVR 144 manuals
Add to My Manuals
Save this manual to your list of manuals |
Page 25 highlights
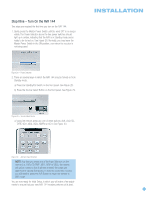
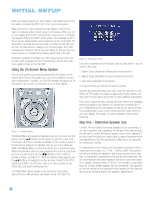
Step Nine - Turn On the AVR 144 Two steps are required the first time you turn on the AVR 144. 1. Gently press the Master Power Switch until the word OFF is no longer visible. The Power Indicator above the two power switches should light up in amber, indicating that the AVR is in Standby mode and is ready to be turned on. See Figure 28. Normally, you may leave the Master Power Switch in the ON position, even when the receiver is not being used. INSTALLATION Figure 28 - Power Switches 2. There are several ways in which the AVR 144 may be turned on from Standby mode. a) Press the Standby/On Switch on the front panel. See Figure 28. b) Press the Source Select Button on the front panel. See Figure 29. Figure 29 - Source Select Button c) Using the remote, press any one of these buttons: AVR, DVD, CD, TAPE, VID1, VID2, VID3, AM/FM or 6CH. See Figure 30. Figure 30 - AVR and Input Selectors NOTE: Any time you press one of the Input Selectors on the remote (i.e., DVD, CD, TAPE, VID1, VID2 or VID3), the remote will switch modes so that it will only transmit the codes programmed to operate that device. In order to control the receiver, you will need to press the AVR Button to return the remote to AVR mode. You are now ready for Initial Setup, in which you will make a few adjustments to ensure that your new AVR 144 receiver performs at its best. 25
-
 1
1 -
2
-
3
-
4
-
5
-
6
-
7
-
8
-
9
-
10
-
11
-
12
-
13
-
14
-
15
-
16
-
17
-
18
-
19
-
 20
20 -
 21
21 -
 22
22 -
 23
23 -
 24
24 -
 25
25 -
 26
26 -
 27
27 -
 28
28 -
 29
29 -
 30
30 -
31
-
32
-
33
-
34
-
35
-
36
-
37
-
38
-
39
-
40
-
41
-
42
-
43
-
44
-
45
-
46
-
47
-
48
-
49
-
50
-
51
-
52
-
53
-
54
-
55
-
56
-
57
-
58
-
59
-
60
-
61
-
62
-
63
-
64
 |
 |
