Harman Kardon AVR75 Owners Manual - Page 13
Tune/Search & Fast Forward
 |
View all Harman Kardon AVR75 manuals
Add to My Manuals
Save this manual to your list of manuals |
Page 13 highlights
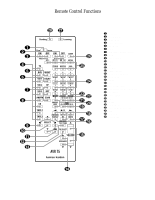
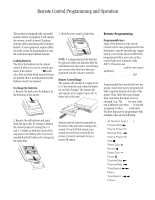
Remote Control Functions 11 a Use/Learn: This switch selects the operation mode of the remote control. Slide it to the left for normal operation. Slide it to the right when the remote is being programmed. b Source Power: Press these buttons to control power for the last source device selected when power on/off commands have been programmed into the remote's memory. c Main Power: Press these buttons to turn the unit on or off. d Source Selection: Pressing one of these buttons selects the input source that will be listened to through the receiver. When a source is selected the remote's transport and numeric number buttons will also transmit the commands needed to control that machine. e Night Mode: Press this button to activate the "Night" mode, preventing loud playback when the digital modes are in use without altering the dynamic range of the output signal. f Delay: Press this button to change the delay for the surround channels when the Surround Mode Menu is on the screen. g Digital Audio Input Selectors: Press one of these buttons to select a digital input source. The digital audio source may be the same as, or different analog audio of the selected video source. h AM/FM: Press this button to select the AVR75's tuner as an input source. Pressing this button when the tuner is in use will switch between the AM and FM bands. i Menu Controls: These buttons control the action of the cursor or the selection of menu items when the receiver is being configured using the setup menus. j Select: This button enters settings to the receiver's memory during system configuration. k OSD: Press this button to activate the on-screen menu system. l Test Tone: Press this button to begin calibration of the output level for each channel. A test signal will immediately be heard from the left front speaker and the Test indicator O will flash. m Channel Select: Press this button to view a status report of the output level for each channel (see figure #9 on page 25). When the Test Tone is audible and the system output levels are being set, pressing this button will advance the channel being adjusted in a clockwise direction to the next channel. n Speaker Level Adjust: When setting the system output levels, press these buttons to increase or decrease the output level. o Main Volume: These buttons control the unit's volume. Note that all channels are controlled simultaneously. p Display: Press this button to turn off all displays and indicators in the Information Display except for a small Disp indication in the lower right corner of the display H. Press the button again to turn the display back on. q Mute: Press this button to temporarily cut the audio output of the receiver. Press it again to return to the previous volume level. r Transport Controls: These buttons may be programmed to control the tape or disc motion of the last playback source selected with the Source Selection buttons d. Use them as you would the Play, Stop, Pause, Record, Reverse Play and Forward Play buttons on any VCR, CD, cassette, DVD or LD remote control. The Reverse Play button fi also operates the FM Mode function of the AVR75's tuner. NOTE: The and Í buttons are also used to control the PTY, AF and RDS Display functions of the tuner (see page 25). s Tune/Search & Fast Forward: These buttons may be programmed to have multiple functions, which vary according to the input device selected. a. When the TUNER has been selected, these buttons are used to tune stations. b. When CD, Tape, DVD, LD or VCR is the input source, these buttons act as the Fast Scan Forward - or Fast Scan Reverse , controls. t Preset/Disc: These buttons have multiple functions, which vary according to the input device selected. a. When the TUNER has been selected, these buttons will scroll up · or down ‡ through the stations that have been programmed in the preset memory.
-
 1
1 -
2
-
3
-
4
-
5
-
6
-
7
-
 8
8 -
 9
9 -
 10
10 -
 11
11 -
 12
12 -
 13
13 -
 14
14 -
 15
15 -
 16
16 -
 17
17 -
 18
18 -
19
-
20
-
21
-
22
-
23
-
24
-
25
-
26
-
27
-
28
-
29
-
30
-
31
-
32
-
33
-
34
-
35
-
36
 |
 |
