Harman Kardon AVR75 Owners Manual - Page 21
the next setting.
 |
View all Harman Kardon AVR75 manuals
Add to My Manuals
Save this manual to your list of manuals |
Page 21 highlights
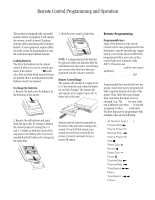
System Configuration 19 9. Enter the information for the SURROUND CH. speaker by using the ‹ or › buttons i on the remote to select the type of surround channel speaker that will be used. Press the buttons so that LARGE, SMALL or NONE is highlighted to match the speaker type you will use as described in #7 above. The LARGE setting sends a full range output to the left/right surround speakers, while the SMALL setting sends low-frequency sounds to the subwoofer output or to the front speakers when no subwoofer is selected. If the surround speakers will not be used, the NONE setting will send the audio for the surround channels to the front left/right speakers. When the selection has been made, press the ¤ button once so that the on-screen cursor > is pointing to GO TO SETUP MENU 2. Press Select j to move to the next menu. 10. At SETUP MENU 2 (see figure #3), you enter information that configures the AVR75 for the type of center channel speaker to be used, and whether or not a subwoofer is in use. While the on-screen cursor is pointing to CENTER CH. press the ‹ or › buttons i on the remote to select the correct type of center channel speaker as described in #7. When LARGE is highlighted a full-range signal will be sent to the center channel. When SMALL is highlighted the audio to the center channel will be cut at 100Hz and low-frequency information will be routed to the subwoofer output or to the front left/right speakers if no subwoofer is selected. When the selection has been made, press the ¤ button once so that the on-screen cursor > is pointing to the SUBWOOFER line of the display. 11. At the SUBWOOFER line use the ‹ or › buttons i on the remote to highlight ON or OFF. Select ON when an optional external subwoofer is connected to the Subwoofer Preamp Output ⁄. If a subwoofer is not used, highlight OFF. In this position all lowfrequency sounds (below 100Hz) will be routed to the front left/right speakers. Note that the subwoofer cannot be set to OFF when the front speakers are set to SMALL in SETUP MENU 1. When the selection has been made press the ¤ button once so that the on-screen cursor > is pointing to GO TO SETUP MENU 3. Press Select j to move to the next menu. 12. At SETUP MENU 3 (see figure #4), various control functions will be set. The first item is the LFE LEVEL CONTROL. "LFE" is the Low-Frequency Effects channel that is used when Dolby Digital signals are present. The normal setting for LFE is 0dB, but the control may also be set to -10dB for reduced output when an LFE signal is present. The LFE may also be turned OFF to reduce low-frequency reproduction. When the LFE level is set, or to bypass this setting, press the ¤ button i on the remote to move to the next setting. NOTE: When the LFE is set to OFF the LFE output is cut, and not sent to any other speaker. 13. The next line is the NIGHT MODE setting. This feature reduces the input level for Dolby Digital sources only by 1/3 to 1/4 at their loudest thresholds, preventing unwanted bursts of loud sounds without restricting the dynamic range or volume of other sounds or at less than maximum levels. The feature may be turned OFF by pressing the ‹ or › buttons i on the remote until OFF is highlighted. The Night mode may also be turned on and off at any time by pressing the Night button e on the remote. When the Night mode is set, or to bypass this setting, press the ¤ button i to move to the next setting. 14. The SETUP LOCK prevents any of the major control settings from being changed once it is engaged. This feature is set at the factory to UNLOCK, so that all settings may be adjusted. If you wish to prevent settings from being easily or inadvertently being changed, use the ‹ or › buttons i on the remote until LOCK is highlighted. Once the LOCK setting is engaged and you exit SETUP MENU 3, no changes may be made to any of the Setup menus. To make changes to these menus you must return to SETUP MENU 3 and use the ‹ or › buttons i on the remote until UNLOCK is highlighted. When the LOCK setting is engaged, the word LOCK will appear at the top of the menus to remind you that no changes may be made. When all adjustments have been made, press the ¤ button i twice and then press Select j to RETURN TO THE MAIN MENU. At this point you may wish to adjust the delay time settings, although it is
-
 1
1 -
2
-
3
-
4
-
5
-
6
-
7
-
8
-
9
-
10
-
11
-
12
-
13
-
14
-
15
-
 16
16 -
 17
17 -
 18
18 -
 19
19 -
 20
20 -
 21
21 -
 22
22 -
 23
23 -
 24
24 -
 25
25 -
 26
26 -
27
-
28
-
29
-
30
-
31
-
32
-
33
-
34
-
35
-
36
 |
 |
