Hayward CAT 3500 CAT 3500 Owners Manual - Page 6
Working with Tru-Seal Fluid Connections for a Fast, Professional Installation See diagram below.
 |
View all Hayward CAT 3500 manuals
Add to My Manuals
Save this manual to your list of manuals |
Page 6 highlights
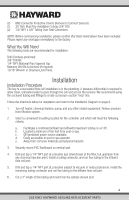
7. Remove pH and ORP sensors from the plastic storage bottles and save bottles and storage fluid for future use. Thread sensors into flow cell. 8. Remove BNC protective covers from left side of controller unit and store for future use. These covers protect the controller unit from electrostatic discharge (ESD) and should be used whenever handling or transporting the controller unit. 9. Connect the pH, ORP and Flow sensor cables to the controller unit as labeled. Sensor cables are constructed from a specialized material - never cut or splice. 10. Drill and tap a 1/4" NPT port at the location from which temperature measurement is desired (upstream from heater). Insert temperature sensor and connect to controller. 11. If new or additional chemical feeders are to be used with the controller, install according to manufacturer's instructions at this time. 12. Connect chemical feeders to the controller as labeled (See diagram below). 13 Check all electrical and mechanical connections. Resume filtration system operation and check for any leaks. Influent Effluent Sample Stream Power pH feed ORP feed Working with Tru-Seal Fluid Connections for a Fast, Professional Installation (See diagram below). Body O-Ring Collet Tubing Prepare Tubing: Insert Tubing To Release Tubing: Cut tubing squarely Insert tubing straight Push collet toward and remove any into fitting until it fitting body and pull burrs. Mark tubing bottoms out and on tubing to release. 3/4" from end. This insertion mark is no Repeat steps 1 and 2 is the insertion mark. longer visible. to reuse fitting. 5 USE ONLY HAYWARD GENUINE REPLACEMENT PARTS
-
 1
1 -
 2
2 -
 3
3 -
 4
4 -
 5
5 -
 6
6 -
 7
7 -
 8
8 -
 9
9 -
 10
10 -
 11
11 -
 12
12 -
13
-
14
-
15
-
16
-
17
-
18
-
19
-
20
-
21
-
22
-
23
-
24
-
25
-
26
-
27
-
28
-
29
-
30
-
31
-
32
 |
 |
