HealthRider 250p Treadmill Uk Manual - Page 9
Installing The Receiver For The Optional Chest Pulse Sensor
 |
View all HealthRider 250p Treadmill manuals
Add to My Manuals
Save this manual to your list of manuals |
Page 9 highlights
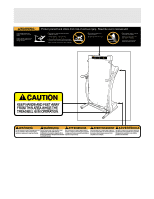
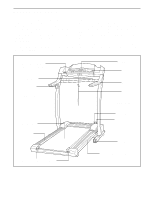
INSTALLING THE RECEIVER FOR THE OPTIONAL CHEST PULSE SENSOR If you purchase the optional chest pulse sensor (see page 20), follow the steps below to install the receiver and the short jumper wire included with the chest pulse sensor. 1. Make sure that the power cord is unplugged. Remove the indicated Screws (46) from the Console Back (116). 1 Remove the Console Back from the Console Base (87). 116 87 46 2. Connect the short jumper wire (A) to the wire on the re- ceiver (B). Connect the other end of the short jumper wire 2a 87 2b to the PULSE jack on the back of the Console (87) (see PULSE drawing 2b). (Note: If there is already a wire plugged into Jack 87 the PULSE jack, unplug it.) Next, peel the paper off the adhesive pad on the back of the receiver (B). Turn the re- ceiver so the cylinder is in the position shown, and at- tach the receiver inside of the Console Base (87) in the in- dicated location. Use the included plastic tie to tie wires if needed. Note: The other wires included with the receiver may be discarded. A Cylinder Make sure that no wires are pinched. See step 1. B Reattach the Console Back (116) with the Screws (46). 9
-
 1
1 -
2
-
3
-
 4
4 -
 5
5 -
 6
6 -
 7
7 -
 8
8 -
 9
9 -
 10
10 -
 11
11 -
 12
12 -
 13
13 -
 14
14 -
15
-
16
-
17
-
18
-
19
-
20
-
21
-
22
-
23
-
24
-
25
-
26
-
27
-
28
-
29
-
30
 |
 |
