HP 2300d Service Manual - Page 78
Cleaning the fuser, Cleaning the outside of the printer, To run the cleaning
 |
UPC - 808736471091
View all HP 2300d manuals
Add to My Manuals
Save this manual to your list of manuals |
Page 78 highlights
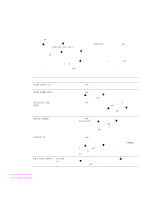
CAUTION Cleaning the fuser Run the printer cleaning page to remove toner and paper particles that can sometimes accumulate on the fuser. Accumulation of toner and particles can cause specks to appear on the front or back side of your print jobs. (See "Toner specks" on page 213.) To ensure optimum print quality, HP recommends that you use the cleaning page every time that you replace the print cartridge or on an automatic interval that you can set up. The cleaning procedure takes about 2.5 minutes to complete. A message (either CREATING CLEANING PAGE or CLEANING) appears on the control-panel display while the cleaning is taking place. To run the cleaning page In order for the cleaning page to work correctly, print the page on copier-grade paper (not bond, heavy, or rough paper). 1 If your printer model includes a duplexer, open the rear output bin. 2 Press (SELECT button) to open the menus. 3 Use (UP button) or (SELECT button). (DOWN button) to scroll to CONFIGURE DEVICE, and then press 4 Use (UP button) or (SELECT button). (DOWN button) to scroll to PRINT QUALITY, and then press 5 Use (UP button) or (SELECT button). (DOWN button) to scroll to CREATE CLEANING PAGE, and then press 6 Follow the instructions on the cleaning page to complete the cleaning process. 7 If your printer model includes a duplexer, close the rear output bin. Cleaning the outside of the printer Clean the outside of the printer with a cloth that has been dampened with water. Do not use ammonia-based cleaners on or around the printer. 76 Printer maintenance ENWW
-
 1
1 -
2
-
3
-
4
-
5
-
6
-
7
-
8
-
9
-
10
-
11
-
12
-
13
-
14
-
15
-
16
-
17
-
18
-
19
-
20
-
21
-
22
-
23
-
24
-
25
-
26
-
27
-
28
-
29
-
30
-
31
-
32
-
33
-
34
-
35
-
36
-
37
-
38
-
39
-
40
-
41
-
42
-
43
-
44
-
45
-
46
-
47
-
48
-
49
-
50
-
51
-
52
-
53
-
54
-
55
-
56
-
57
-
58
-
59
-
60
-
61
-
62
-
63
-
64
-
65
-
66
-
67
-
68
-
69
-
70
-
71
-
72
-
 73
73 -
 74
74 -
 75
75 -
 76
76 -
 77
77 -
 78
78 -
 79
79 -
 80
80 -
 81
81 -
 82
82 -
 83
83 -
84
-
85
-
86
-
87
-
88
-
89
-
90
-
91
-
92
-
93
-
94
-
95
-
96
-
97
-
98
-
99
-
100
-
101
-
102
-
103
-
104
-
105
-
106
-
107
-
108
-
109
-
110
-
111
-
112
-
113
-
114
-
115
-
116
-
117
-
118
-
119
-
120
-
121
-
122
-
123
-
124
-
125
-
126
-
127
-
128
-
129
-
130
-
131
-
132
-
133
-
134
-
135
-
136
-
137
-
138
-
139
-
140
-
141
-
142
-
143
-
144
-
145
-
146
-
147
-
148
-
149
-
150
-
151
-
152
-
153
-
154
-
155
-
156
-
157
-
158
-
159
-
160
-
161
-
162
-
163
-
164
-
165
-
166
-
167
-
168
-
169
-
170
-
171
-
172
-
173
-
174
-
175
-
176
-
177
-
178
-
179
-
180
-
181
-
182
-
183
-
184
-
185
-
186
-
187
-
188
-
189
-
190
-
191
-
192
-
193
-
194
-
195
-
196
-
197
-
198
-
199
-
200
-
201
-
202
-
203
-
204
-
205
-
206
-
207
-
208
-
209
-
210
-
211
-
212
-
213
-
214
-
215
-
216
-
217
-
218
-
219
-
220
-
221
-
222
-
223
-
224
-
225
-
226
-
227
-
228
-
229
-
230
-
231
-
232
-
233
-
234
-
235
-
236
-
237
-
238
-
239
-
240
-
241
-
242
-
243
-
244
-
245
-
246
-
247
-
248
-
249
-
250
-
251
-
252
-
253
-
254
-
255
-
256
-
257
-
258
-
259
-
260
-
261
-
262
-
263
-
264
-
265
-
266
-
267
-
268
-
269
-
270
-
271
-
272
-
273
-
274
-
275
-
276
-
277
-
278
-
279
-
280
-
281
-
282
-
283
-
284
-
285
-
286
-
287
-
288
-
289
-
290
-
291
-
292
-
293
-
294
-
295
-
296
 |
 |