HP 6310 Setup Guide - Page 2
Attach the control panel faceplate if not attached, Attach paper trays and load paper - computer
 |
UPC - 882780472747
View all HP 6310 manuals
Add to My Manuals
Save this manual to your list of manuals |
Page 2 highlights
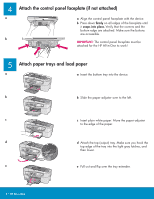
4 a b Attach the control panel faceplate (if not attached) a Align the control panel faceplate with the device. b Press down firmly on all edges of the faceplate until it snaps into place. Verify that the corners and the bottom edge are attached. Make sure the buttons are accessible. IMPORTANT: The control panel faceplate must be attached for the HP All-in-One to work! 5 Attach paper trays and load paper a a Insert the bottom tray into the device. b b Slide the paper adjuster over to the left. c c Insert plain white paper. Move the paper adjuster to the edge of the paper. d d Attach the top (output) tray. Make sure you hook the top edge of the tray into the light gray latches, and then lower. e e Pull out and flip over the tray extender. 2 • HP All-in-One
-
 1
1 -
 2
2 -
 3
3 -
 4
4 -
 5
5 -
 6
6 -
 7
7 -
 8
8 -
9
-
10
-
11
-
12
 |
 |
