HP 6310 Setup Guide - Page 3
Connect the power cord, Connect the phone cord, Press the On button - cartridge
 |
UPC - 882780472747
View all HP 6310 manuals
Add to My Manuals
Save this manual to your list of manuals |
Page 3 highlights
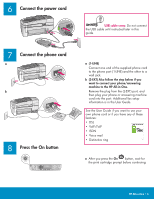
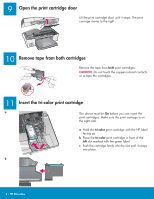
6 Connect the power cord USB cable users: Do not connect the USB cable until instructed later in this guide. 7 Connect the phone cord a b 8 Press the On button a (1-LINE) Connect one end of the supplied phone cord to the phone port (1-LINE) and the other to a wall jack. b (2-EXT) Also follow the step below if you want to connect your phone/answering machine to the HP All-in-One. Remove the plug from the (2-EXT) port, and then plug your phone or answering machine cord into the port. Additional fax setup information is in the User Guide. See the User Guide if you want to use your own phone cord or if you have any of these features: • DSL • VoIP/FoIP • ISDN • Voice mail • Distinctive ring a After you press the On button, wait for the print cartridge prompt before continuing. HP All-in-One • 3
-
 1
1 -
 2
2 -
 3
3 -
 4
4 -
 5
5 -
 6
6 -
 7
7 -
 8
8 -
 9
9 -
10
-
11
-
12
 |
 |
