HP 8/20q HP StorageWorks 8Gb Simple SAN Connection Kit quick start instruction - Page 3
Software installation instructions - storageworks manual
 |
View all HP 8/20q manuals
Add to My Manuals
Save this manual to your list of manuals |
Page 3 highlights
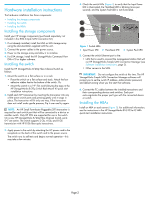
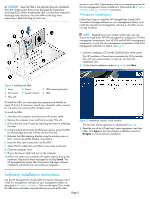
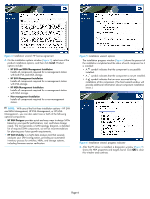
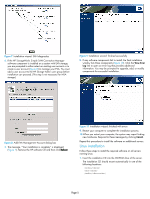
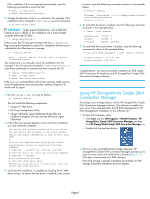
CAUTION: Keep the HBA in the antistatic bag until installation. The HBA contains parts that can be damaged by electrostatic discharge (ESD). Before handling the HBA, use standard methods to discharge static electricity. Place the HBA on the bag when examining it. Retain the bag for future use. 1 2 3 4 5 6 7 servers in your SAN. Depending on the server operating system for the non-management station installations, follow either the Windows installation or Linux installation instructions. Windows installation Follow these steps to install the HP StorageWorks Simple SAN Connection Manager software on your management station, or to install the required non-management software on all other servers running Windows. NOTE: Depending on your storage system type, you can choose to install either HP EVA management components, HP MSA management components, both HP EVA and HP MSA management components, or only the non-management components of the SAN management software; for details, see step 4. 1. Insert the installation CD into the CD-ROM drive of the server. The HP Installation Wizard starts automatically. (If the installer does not start automatically, run Setup.exe from the installation CD.) 2. On the initial installation window (Figure 3), click Next. Figure 2 Installing the HBA 1 Lever 2 Screw 4 Slot covers 5 System chassis 7 PCIe slot 3 HBA retaining bracket 6 HBA To install the HBA, you must open the computer and identify an empty PCIe slot. If necessary, consult your computer system manual for instructions for removing the computer cover. To install the HBA: 1. Shut down the computer and disconnect the power cable. 2. Remove the computer cover and find an empty PCIe slot. 3. Pull out the slot cover (if any) by removing the screw or releasing the lever. 4. Using standard electrostatic handling procedures, grasp the HBA by the top edge and seat it firmly into the PCIe slot. 5. Re-fasten the HBA retaining bracket using the existing screw or lever. Use the low-profile bracket, if necessary. 6. Insert the fiber optic transceiver into the HBA. 7. Attach the FC cable from your HBA to any active switch port. 8. Close the computer cover. 9. Plug in the power cable and turn on the computer. 10.When you restart your computer, the system reports finding new hardware. Respond to these messages by clicking Cancel. The HP StorageWorks Simple SAN Connection Manager software installation will handle the new hardware integration. Figure 3 Installation wizard: initial window The end user license agreement is displayed (Figure 4). 3. Read the text of the HP end user license agreement, and then either click Agree to start the software installation wizard or Disagree to cancel software installation. Software installation instructions Use the HP StorageWorks Simple SAN Connection Manager CD to install the management software on your management station as described in Windows installation. Then use the same CD to install the HBA driver and other required software on each of the other Page 3
-
 1
1 -
 2
2 -
 3
3 -
 4
4 -
 5
5 -
 6
6 -
 7
7
 |
 |
