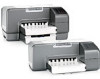
HP Business Inkjet 1200 HP Business Inkjet 1200 - Getting Started Guide - Page 5
HP Business Inkjet 1200 oder die Auto-Duplex-Einheit
 |
View all HP Business Inkjet 1200 manuals
Add to My Manuals
Save this manual to your list of manuals |
Page 5 highlights
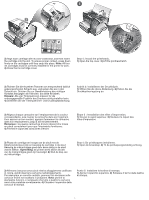
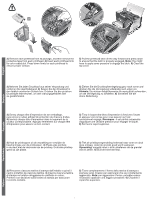
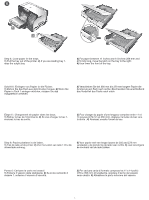
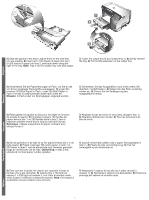
1 2 Step 1: Remove the packing tape and materials. Remove all packing tape from the printer. Open the top cover and remove the tape from the inside of the printer. Step 2: Install the rear-access panel or the auto-duplex unit. On the back of the printer, insert the rear-access panel (HP Business Inkjet 1200) or the auto-duplex unit (HP Business Inkjet 1200d/1200dn/1200dtn/1200dtwn) until it clicks. Schritt 1: Entfernen der Verpackungsklebestreifen und des Verpackungsmaterials. Entfernen Sie möglicherweise vorhandenes Verpackungsmaterial aus dem Drucker. Öffnen Sie die Tintenpatronen- und Druckkopfabdeckung und entfernen Sie die Klebestreifen im Druckergehäuse. Schritt 2: Bringen Sie die hintere Abdeckung oder die Auto-Duplex-Einheit an. Setzen Sie an der Rückseite des Druckers die hintere Abdeckung (HP Business Inkjet 1200) oder die Auto-Duplex-Einheit (HP Business Inkjet 1200d/1200dn/1200dtn/1200dtwn) ein, bis diese einrastet. Étape 1 : Retrait des matériaux d'emballage. Retirez tous les rubans adhésifs de l'imprimante Ouvrez le capot supérieur et retirez le ruban adhésif de l'intérieur de l'imprimante. Étape 2 : Installation du panneau d'accès arrière ou de l'unité auto-duplex. Insérez le panneau d'accès arrière (HP Business Inkjet 1200) ou l'unité auto-duplex (HP Business Inkjet 1200d/1200dn/ 1200dtn/1200dtwn) à l'arrière de l'imprimante jusqu'à ce qu'il/elle s'enclenche. Stap 1: Het verpakkingsmateriaal en de tape verwijderen. Verwijder de plakstroken van de verpakking van de printer. Open de bovenklep en verwijder de plakstroken aan de binnenkant van de printer. Stap 2: Installeer het toegangspaneel aan de achterkant of de automatische duplex-eenheid. Klik het toegangspaneel (HP Business Inkjet 1200) of de automatische duplex-eenheid (HP Business Inkjet 1200d/1200dn/1200dtn/1200dtwn) vast op de achterkant van de printer. Punto 1: Rimuovere il nastro e il materiale di imballo. Togliere completamente il nastro di imballo dalla stampante. Aprire il coperchio superiore e rimuovere il nastro dall'interno della stampante. Punto 2: Installare il pannello di accesso posteriore o l'unità duplex automatico. Inserire il pannello di accesso posteriore (HP Business Inkjet 1200) o l'unità duplex automatico (HP Business Inkjet 1200d/1200dn/1200dtn/1200dtwn) sul retro della stampante e premere finché non scatta in posizione. 4
-
 1
1 -
 2
2 -
 3
3 -
 4
4 -
 5
5 -
 6
6 -
 7
7 -
 8
8 -
 9
9 -
 10
10 -
 11
11 -
12
-
13
-
14
-
15
-
16
-
17
-
18
-
19
-
20
-
21
-
22
-
23
-
24
-
25
-
26
-
27
-
28
-
29
-
30
-
31
-
32
-
33
-
34
-
35
-
36
-
37
-
38
-
39
-
40
-
41
-
42
-
43
-
44
-
45
-
46
-
47
-
48
-
49
-
50
-
51
-
52
-
53
-
54
-
55
-
56
-
57
-
58
-
59
-
60
-
61
-
62
-
63
-
64
-
65
-
66
-
67
-
68
-
69
-
70
-
71
-
72
-
73
-
74
-
75
-
76
 |
 |
