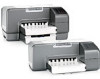
HP Business Inkjet 1200 HP Business Inkjet 1200 - Getting Started Guide - Page 8
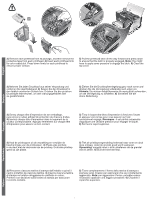
Setzen Sie den Druckkopf
 |
View all HP Business Inkjet 1200 manuals
Add to My Manuals
Save this manual to your list of manuals |
Page 8 highlights
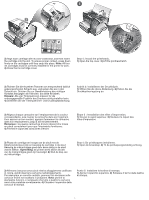
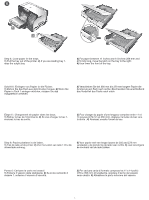
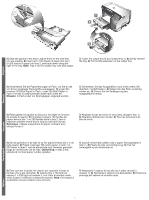
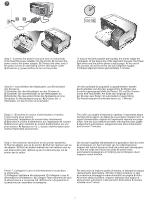
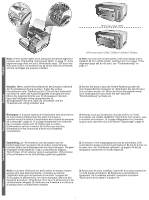
3 4 6 5 English Deutsch Français 3) Remove each printhead from its package, and then remove the protective tape from each printhead. 4) Insert each printhead into its color-coded slot. Press down firmly on each printhead to ensure proper contact. 5) Pull the printhead latch all the way forward and press down to ensure that the latch is properly engaged. Note: You might have to apply some pressure to engage the latch. 6) Close the top cover. 3) Nehmen Sie jeden Druckkopf aus seiner Verpackung und entfernen Sie das Klebeband. 4) Setzen Sie den Druckkopf in den farblich markierten Schacht ein. Drücken Sie die einzelnen Druckköpfe fest herunter, um den ordnungsgemäßen Sitz zu gewährleisten. 5) Ziehen Sie die Druckkopfverriegelung ganz nach vorne und drücken Sie die Verriegelung vollständig nach unten ein. Hinweis: Sie müssen möglicherweise ein wenig Kraft aufwenden, um die Verriegelung zu schließen. 6) Schließen Sie die obere Abdeckung. 3) Sortez chaque tête d'impression de son emballage, puis retirez le ruban adhésif de protection de chacune d'elles. 4) Insérez chaque tête d'impression dans le logement de la couleur correspondante. Appuyez fermement sur chaque tête d'impression pour assurer un bon contact. 5) Tirez le loquet des têtes d'impression à fond vers l'avant et appuyez vers le bas pour vous assurer qu'il est correctement engagé. Remarque : il est parfois nécessaire d'appliquer une certaine pression pour engager le loquet. 6) Fermez le capot supérieur. 3) Haal de printkoppen uit de verpakking en verwijder de beschermtape van de printkoppen. 4) Plaats elke printkop in de sleuf met de kleurcode van de printkop. Druk elke printkop goed op zijn plaats. 5) Trek de printkopvergrendeling helemaal naar voren en druk deze omlaag, zodat de grendel goed wordt vastgezet. Opmerking: mogelijk moet u druk uitoefenen om de grendel vast te zetten. 6) Sluit de bovenste klep. 3) Rimuovere ciascuna testina di stampa dall'imballo e quindi il nastro protettivo da ciascuna testina. 4) Inserire ciascuna testina di stampa nel relativo alloggiamento codificato in colore. Premere con decisione sulla testina di stampa per assicurare il corretto contatto. 5) Tirare completamente il fermo della testina di stampa e premere verso il basso per assicurarsi che sia correttamente agganciato. Nota: per agganciare il fermo, potrebbe essere necessario applicare una leggera pressione. 6) Chiudere il coperchio superiore. 7 Nederlands Italiano
-
 1
1 -
2
-
 3
3 -
 4
4 -
 5
5 -
 6
6 -
 7
7 -
 8
8 -
 9
9 -
 10
10 -
 11
11 -
 12
12 -
 13
13 -
14
-
15
-
16
-
17
-
18
-
19
-
20
-
21
-
22
-
23
-
24
-
25
-
26
-
27
-
28
-
29
-
30
-
31
-
32
-
33
-
34
-
35
-
36
-
37
-
38
-
39
-
40
-
41
-
42
-
43
-
44
-
45
-
46
-
47
-
48
-
49
-
50
-
51
-
52
-
53
-
54
-
55
-
56
-
57
-
58
-
59
-
60
-
61
-
62
-
63
-
64
-
65
-
66
-
67
-
68
-
69
-
70
-
71
-
72
-
73
-
74
-
75
-
76
 |
 |
