HP C3180A Service Manual - Page 110
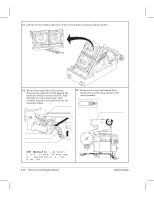
Ć46, Removal and Replacement, allowing the tensioner plate to move
 |
View all HP C3180A manuals
Add to My Manuals
Save this manual to your list of manuals |
Page 110 highlights
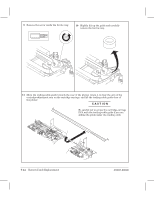
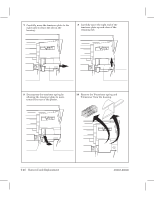
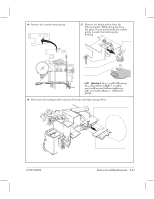
7 Carefully move the tensioner plate to the right until it clears the slot in the housing. 8 Carefully move the right end of the tensioner plate up and clear of the retaining tab. Slot Tensioner plate Tab Tensioner plate 9 Decompress the tensioner spring by allowing the tensioner plate to move toward the rear of the plotter. 10 Remove the YĆtensioner spring and YĆtensioner from the housing. Tensioner spring Tensioner plate 6Ć46 Removal and Replacement C3187Ć90000
-
 1
1 -
2
-
3
-
4
-
5
-
6
-
7
-
8
-
9
-
10
-
11
-
12
-
13
-
14
-
15
-
16
-
17
-
18
-
19
-
20
-
21
-
22
-
23
-
24
-
25
-
26
-
27
-
28
-
29
-
30
-
31
-
32
-
33
-
34
-
35
-
36
-
37
-
38
-
39
-
40
-
41
-
42
-
43
-
44
-
45
-
46
-
47
-
48
-
49
-
50
-
51
-
52
-
53
-
54
-
55
-
56
-
57
-
58
-
59
-
60
-
61
-
62
-
63
-
64
-
65
-
66
-
67
-
68
-
69
-
70
-
71
-
72
-
73
-
74
-
75
-
76
-
77
-
78
-
79
-
80
-
81
-
82
-
83
-
84
-
85
-
86
-
87
-
88
-
89
-
90
-
91
-
92
-
93
-
94
-
95
-
96
-
97
-
98
-
99
-
100
-
101
-
102
-
103
-
104
-
 105
105 -
 106
106 -
 107
107 -
 108
108 -
 109
109 -
 110
110 -
 111
111 -
 112
112 -
 113
113 -
 114
114 -
 115
115 -
116
-
117
-
118
-
119
-
120
-
121
-
122
-
123
-
124
-
125
-
126
-
127
-
128
-
129
-
130
-
131
-
132
-
133
-
134
-
135
-
136
-
137
-
138
-
139
-
140
-
141
-
142
-
143
-
144
-
145
-
146
-
147
-
148
-
149
-
150
-
151
-
152
-
153
-
154
-
155
-
156
-
157
-
158
-
159
-
160
-
161
-
162
-
163
-
164
-
165
-
166
-
167
-
168
-
169
-
170
-
171
-
172
-
173
-
174
-
175
-
176
-
177
-
178
-
179
-
180
-
181
-
182
-
183
-
184
-
185
-
186
-
187
-
188
-
189
-
190
-
191
-
192
-
193
-
194
-
195
-
196
-
197
-
198
-
199
-
200
-
201
-
202
-
203
-
204
-
205
-
206
-
207
-
208
-
209
-
210
-
211
-
212
-
213
-
214
-
215
-
216
-
217
-
218
-
219
-
220
-
221
-
222
-
223
-
224
-
225
-
226
-
227
-
228
-
229
-
230
-
231
-
232
-
233
-
234
-
235
-
236
-
237
-
238
-
239
-
240
-
241
-
242
-
243
-
244
-
245
-
246
 |
 |

7
Carefully move the tensioner plate to the
right until it clears the slot in the
housing.
Tensioner plate
Slot
8
Carefully move the right end of the
tensioner plate up and clear of the
retaining tab.
Tensioner plate
Tab
9
Decompress the tensioner spring by
allowing the tensioner plate to move
toward the rear of the plotter.
Tensioner plate
Tensioner
spring
10
Remove the YĆtensioner spring and
YĆtensioner from the housing.
6Ć46
Removal and Replacement
C3187Ć90000