HP C3180A Service Manual - Page 88
Removing the Window Sensor
 |
View all HP C3180A manuals
Add to My Manuals
Save this manual to your list of manuals |
Page 88 highlights
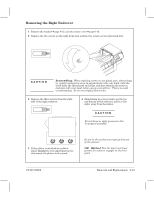
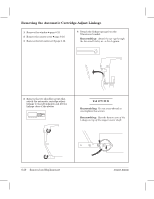
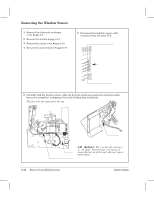
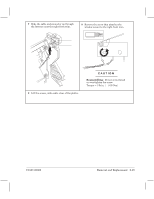
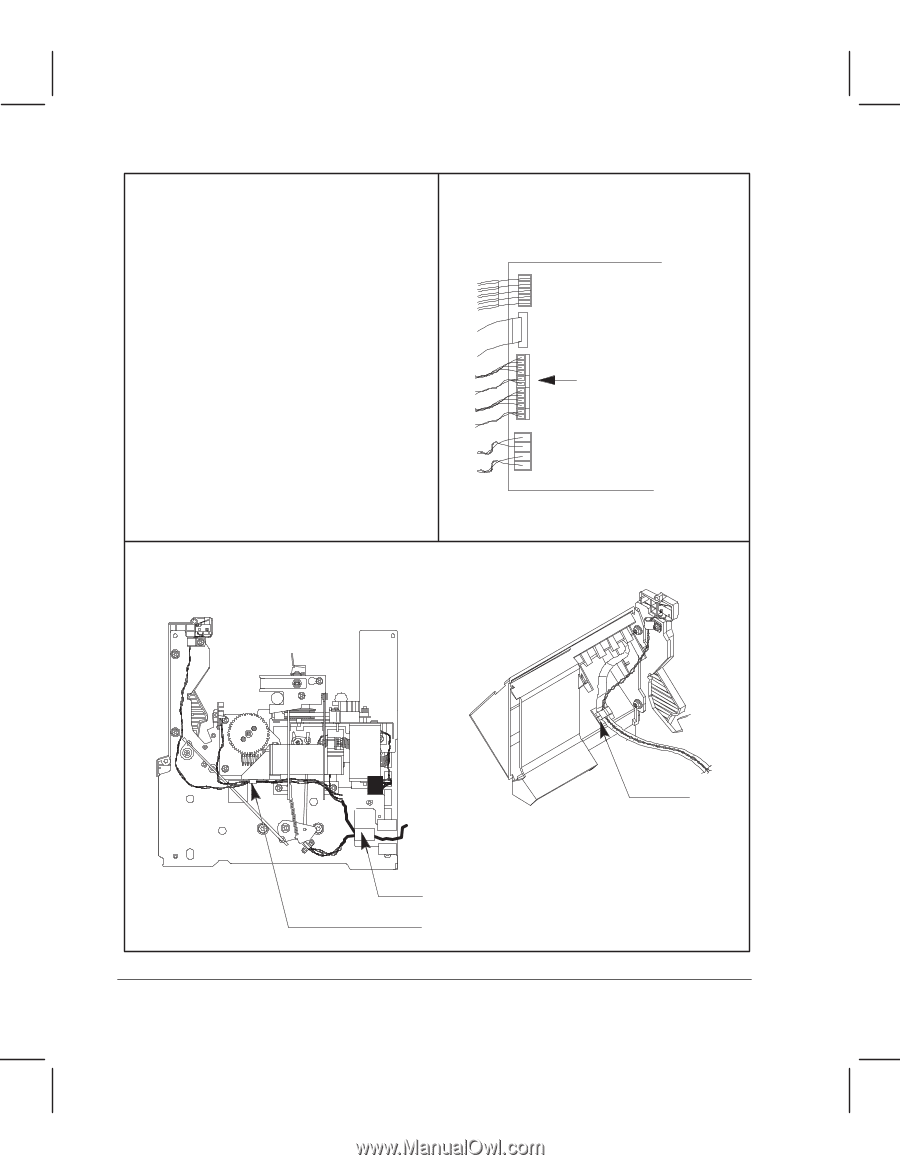
Removing the Window Sensor 1 Remove the electronicsĆenclosure cover D page 6Ć5. 2 Remove the window D page 6Ć15. 3 Remove the center cover D page 6Ć16. 4 Remove the right endcover D page 6Ć19. 5 Disconnect the windowĆsensor cable connector from the main PCA. Window-sensor connector 6 Carefully feed the windowĆsensor cable out from the electronics enclosure and from under the motor assemblies, unclipping it from the holding clips and ferrite. The ferr te ho der opens from the top Clip Ferrite Clip 0D2 DmbtinJ: Pos t on the cab e correct y as nd cated Incorrect pos t on ng cou d cause obstruct on of the cartr dge carr age or motor gears 6Ć24 Removal and Replacement C3187Ć90000
-
 1
1 -
2
-
3
-
4
-
5
-
6
-
7
-
8
-
9
-
10
-
11
-
12
-
13
-
14
-
15
-
16
-
17
-
18
-
19
-
20
-
21
-
22
-
23
-
24
-
25
-
26
-
27
-
28
-
29
-
30
-
31
-
32
-
33
-
34
-
35
-
36
-
37
-
38
-
39
-
40
-
41
-
42
-
43
-
44
-
45
-
46
-
47
-
48
-
49
-
50
-
51
-
52
-
53
-
54
-
55
-
56
-
57
-
58
-
59
-
60
-
61
-
62
-
63
-
64
-
65
-
66
-
67
-
68
-
69
-
70
-
71
-
72
-
73
-
74
-
75
-
76
-
77
-
78
-
79
-
80
-
81
-
82
-
 83
83 -
 84
84 -
 85
85 -
 86
86 -
 87
87 -
 88
88 -
 89
89 -
 90
90 -
 91
91 -
 92
92 -
 93
93 -
94
-
95
-
96
-
97
-
98
-
99
-
100
-
101
-
102
-
103
-
104
-
105
-
106
-
107
-
108
-
109
-
110
-
111
-
112
-
113
-
114
-
115
-
116
-
117
-
118
-
119
-
120
-
121
-
122
-
123
-
124
-
125
-
126
-
127
-
128
-
129
-
130
-
131
-
132
-
133
-
134
-
135
-
136
-
137
-
138
-
139
-
140
-
141
-
142
-
143
-
144
-
145
-
146
-
147
-
148
-
149
-
150
-
151
-
152
-
153
-
154
-
155
-
156
-
157
-
158
-
159
-
160
-
161
-
162
-
163
-
164
-
165
-
166
-
167
-
168
-
169
-
170
-
171
-
172
-
173
-
174
-
175
-
176
-
177
-
178
-
179
-
180
-
181
-
182
-
183
-
184
-
185
-
186
-
187
-
188
-
189
-
190
-
191
-
192
-
193
-
194
-
195
-
196
-
197
-
198
-
199
-
200
-
201
-
202
-
203
-
204
-
205
-
206
-
207
-
208
-
209
-
210
-
211
-
212
-
213
-
214
-
215
-
216
-
217
-
218
-
219
-
220
-
221
-
222
-
223
-
224
-
225
-
226
-
227
-
228
-
229
-
230
-
231
-
232
-
233
-
234
-
235
-
236
-
237
-
238
-
239
-
240
-
241
-
242
-
243
-
244
-
245
-
246
 |
 |
1
Remove the electronicsĆenclosure
cover
D
page 6Ć5.
2
Remove the window
D
page 6Ć15.
3
Remove the center cover
D
page 6Ć16.
4
Remove the right endcover
D
page 6Ć19.
5
Disconnect the windowĆsensor cable
connector from the main PCA.
Window-sensor
connector
Clip
Clip
0D2
DmbtinJ:
Pos t on the cab e correct y
as nd cated
Incorrect pos t on ng cou d
cause obstruct on of the cartr dge carr age or
motor gears
Ferrite
6
Carefully feed the windowĆsensor cable out from the electronics enclosure and from under
the motor assemblies, unclipping it from the holding clips and ferrite.
The ferr te ho der opens from the top
6Ć24
Removal and Replacement
C3187Ć90000
Removing the Window Sensor