HP Color LaserJet Enterprise M751 User Guide - Page 176
Troubleshoot image defects, Calibrating
 |
View all HP Color LaserJet Enterprise M751 manuals
Add to My Manuals
Save this manual to your list of manuals |
Page 176 highlights
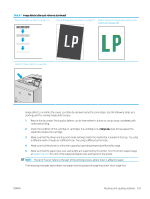
3. Select Start to start the calibration process. A Calibrating message will display on the printer control panel. The calibration process takes a few minutes to complete. Do not turn the printer off until the calibration process has finished. 4. Wait while the printer calibrates, and then try printing again. Troubleshoot image defects Table 6-1 Image defects table quick reference Table 6-9 Light print on page 172 Table 6-7 Gray background or dark print on page 171 Table 6-4 Blank page - No print on page 169 Table 6-3 Black page on page 168 Table 6-2 Banding defects on page 168 Table 6-11 Streak defects on page 174 166 Chapter 6 Solve problems ENWW
-
 1
1 -
2
-
3
-
4
-
5
-
6
-
7
-
8
-
9
-
10
-
11
-
12
-
13
-
14
-
15
-
16
-
17
-
18
-
19
-
20
-
21
-
22
-
23
-
24
-
25
-
26
-
27
-
28
-
29
-
30
-
31
-
32
-
33
-
34
-
35
-
36
-
37
-
38
-
39
-
40
-
41
-
42
-
43
-
44
-
45
-
46
-
47
-
48
-
49
-
50
-
51
-
52
-
53
-
54
-
55
-
56
-
57
-
58
-
59
-
60
-
61
-
62
-
63
-
64
-
65
-
66
-
67
-
68
-
69
-
70
-
71
-
72
-
73
-
74
-
75
-
76
-
77
-
78
-
79
-
80
-
81
-
82
-
83
-
84
-
85
-
86
-
87
-
88
-
89
-
90
-
91
-
92
-
93
-
94
-
95
-
96
-
97
-
98
-
99
-
100
-
101
-
102
-
103
-
104
-
105
-
106
-
107
-
108
-
109
-
110
-
111
-
112
-
113
-
114
-
115
-
116
-
117
-
118
-
119
-
120
-
121
-
122
-
123
-
124
-
125
-
126
-
127
-
128
-
129
-
130
-
131
-
132
-
133
-
134
-
135
-
136
-
137
-
138
-
139
-
140
-
141
-
142
-
143
-
144
-
145
-
146
-
147
-
148
-
149
-
150
-
151
-
152
-
153
-
154
-
155
-
156
-
157
-
158
-
159
-
160
-
161
-
162
-
163
-
164
-
165
-
166
-
167
-
168
-
169
-
170
-
 171
171 -
 172
172 -
 173
173 -
 174
174 -
 175
175 -
 176
176 -
 177
177 -
 178
178 -
 179
179 -
 180
180 -
 181
181 -
182
-
183
-
184
-
185
-
186
-
187
-
188
-
189
-
190
 |
 |

3.
Select
Start
to start the calibration process.
A
Calibrating
message will display on the printer control panel. The calibration process takes a few minutes
to complete. Do not turn the printer off until the calibration process has finished.
4.
Wait while the printer calibrates, and then try printing again.
Troubleshoot image defects
Table 6-1
Image defects table quick reference
Table
6
-
9
Light print
on page
172
Table
6
-
7
Gray background or dark print
on page
171
Table
6
-
4
Blank page — No print
on page
169
Table
6
-
3
Black page
on page
168
Table
6
-
2
Banding defects
on page
168
Table
6
-
11
Streak defects
on page
174
166
Chapter 6
Solve problems
ENWW