HP Color LaserJet Enterprise MFP 5800dn User Guide - Page 125
Fax, Set up fax, Introduction, Set up fax by using the printer control panel
 |
View all HP Color LaserJet Enterprise MFP 5800dn manuals
Add to My Manuals
Save this manual to your list of manuals |
Page 125 highlights
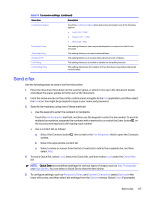
7 Fax Configure the fax features, and send and receive faxes using the printer. The following information is correct at the time of publication. For current information, see Support for HP Color LaserJet Enterprise MFP 5800. For more information: HP's all-inclusive help for the printer includes the following information: ● Install and configure ● Learn and use ● Solve problems ● Download software and firmware updates ● Join support forums ● Find warranty and regulatory information Set up fax Set up the fax features for the printer. Introduction This information applies to fax and Flow models, or to other printers when an optional analog fax accessory has been installed. Before continuing, connect the printer to a phone line (for analog fax) or to an Internet or network fax service. Set up fax by using the printer control panel Configure the fax features using the control panel. 1. From the Home screen on the printer control panel, navigate to the Settings application, and then select the Settings icon. 2. Open the following menus: a. Fax b. Internal Fax Modem Setup NOTE: If the Internal Fax Modem Setup menu does not appear in the menu listing, LAN or Internet fax might be enabled. When LAN or Internet fax is enabled, the analog fax accessory is disabled and the Internal Fax Modem Setup menu does not display. Only one fax feature, either LAN fax, analog fax, or Internet fax, can be enabled at a time. To use analog fax when LAN fax is enabled, use the HP Embedded Web Server to disable LAN fax. 3. Select the location from the list on the right side of the screen, and then select Next. Fax 113
-
 1
1 -
2
-
3
-
4
-
5
-
6
-
7
-
8
-
9
-
10
-
11
-
12
-
13
-
14
-
15
-
16
-
17
-
18
-
19
-
20
-
21
-
22
-
23
-
24
-
25
-
26
-
27
-
28
-
29
-
30
-
31
-
32
-
33
-
34
-
35
-
36
-
37
-
38
-
39
-
40
-
41
-
42
-
43
-
44
-
45
-
46
-
47
-
48
-
49
-
50
-
51
-
52
-
53
-
54
-
55
-
56
-
57
-
58
-
59
-
60
-
61
-
62
-
63
-
64
-
65
-
66
-
67
-
68
-
69
-
70
-
71
-
72
-
73
-
74
-
75
-
76
-
77
-
78
-
79
-
80
-
81
-
82
-
83
-
84
-
85
-
86
-
87
-
88
-
89
-
90
-
91
-
92
-
93
-
94
-
95
-
96
-
97
-
98
-
99
-
100
-
101
-
102
-
103
-
104
-
105
-
106
-
107
-
108
-
109
-
110
-
111
-
112
-
113
-
114
-
115
-
116
-
117
-
118
-
119
-
 120
120 -
 121
121 -
 122
122 -
 123
123 -
 124
124 -
 125
125 -
 126
126 -
 127
127 -
 128
128 -
 129
129 -
 130
130 -
131
-
132
-
133
-
134
-
135
-
136
-
137
-
138
-
139
-
140
-
141
-
142
-
143
-
144
-
145
-
146
-
147
-
148
-
149
-
150
-
151
-
152
-
153
-
154
-
155
-
156
-
157
-
158
-
159
-
160
-
161
-
162
-
163
-
164
-
165
-
166
-
167
-
168
-
169
-
170
-
171
-
172
-
173
-
174
-
175
-
176
-
177
-
178
-
179
-
180
-
181
-
182
-
183
-
184
-
185
-
186
-
187
-
188
-
189
-
190
-
191
-
192
-
193
-
194
-
195
-
196
-
197
-
198
-
199
-
200
-
201
-
202
-
203
-
204
-
205
-
206
-
207
-
208
-
209
-
210
-
211
-
212
-
213
-
214
-
215
-
216
-
217
-
218
-
219
-
220
-
221
-
222
-
223
-
224
-
225
-
226
-
227
-
228
-
229
-
230
-
231
-
232
-
233
-
234
-
235
-
236
-
237
-
238
-
239
-
240
-
241
-
242
-
243
-
244
-
245
-
246
-
247
-
248
-
249
-
250
-
251
-
252
-
253
-
254
-
255
-
256
-
257
-
258
-
259
-
260
-
261
-
262
-
263
-
264
-
265
-
266
-
267
-
268
-
269
-
270
-
271
-
272
-
273
-
274
-
275
-
276
-
277
-
278
-
279
-
280
-
281
-
282
 |
 |
