HP Color LaserJet Enterprise MFP 5800dn User Guide - Page 131
Create a fax printing schedule, Settings, Fax Receive Settings, Incoming Fax Options, Use Schedule
 |
View all HP Color LaserJet Enterprise MFP 5800dn manuals
Add to My Manuals
Save this manual to your list of manuals |
Page 131 highlights
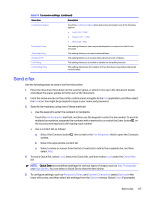
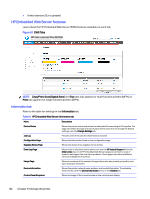
Table 7-5 Buttons on the right side of the preview pane (continued) Button Description Use these buttons to rearrange the pages within the document. Select one or more pages and move them to the left or right. NOTE: These buttons are available only in the thumbnail view. Use this button to add a page to the document. The printer prompts to scan additional pages. Use this button to clear the changes made in the preview and start over. Touch this button to collapse the preview screen and return to the Copy screen. 7. When the document is ready, select Send to send the fax. Create a fax printing schedule Faxes print automatically upon receipt, but they can also be stored and printed on a schedule that you determine. After you create the schedule, you can enable or disable the schedule as needed. 1. From the Home screen on the printer control panel, navigate to the Settings application, and then select the Settings icon. 2. Open the following menus: a. Fax b. Fax Receive Settings c. Fax Printing Schedule 3. Under Incoming Fax Options, select Use Schedule. 4. Select New Event. 5. Select an option under Event Type. ● Begin Printing ● Begin Storing 6. Choose a time and the day. You can select multiple days. 7. Select Save. To add another event, repeat steps 4 - 6. 8. Select Done to enable the fax printing schedule. Create a fax printing schedule 119
-
 1
1 -
2
-
3
-
4
-
5
-
6
-
7
-
8
-
9
-
10
-
11
-
12
-
13
-
14
-
15
-
16
-
17
-
18
-
19
-
20
-
21
-
22
-
23
-
24
-
25
-
26
-
27
-
28
-
29
-
30
-
31
-
32
-
33
-
34
-
35
-
36
-
37
-
38
-
39
-
40
-
41
-
42
-
43
-
44
-
45
-
46
-
47
-
48
-
49
-
50
-
51
-
52
-
53
-
54
-
55
-
56
-
57
-
58
-
59
-
60
-
61
-
62
-
63
-
64
-
65
-
66
-
67
-
68
-
69
-
70
-
71
-
72
-
73
-
74
-
75
-
76
-
77
-
78
-
79
-
80
-
81
-
82
-
83
-
84
-
85
-
86
-
87
-
88
-
89
-
90
-
91
-
92
-
93
-
94
-
95
-
96
-
97
-
98
-
99
-
100
-
101
-
102
-
103
-
104
-
105
-
106
-
107
-
108
-
109
-
110
-
111
-
112
-
113
-
114
-
115
-
116
-
117
-
118
-
119
-
120
-
121
-
122
-
123
-
124
-
125
-
 126
126 -
 127
127 -
 128
128 -
 129
129 -
 130
130 -
 131
131 -
 132
132 -
 133
133 -
 134
134 -
 135
135 -
 136
136 -
137
-
138
-
139
-
140
-
141
-
142
-
143
-
144
-
145
-
146
-
147
-
148
-
149
-
150
-
151
-
152
-
153
-
154
-
155
-
156
-
157
-
158
-
159
-
160
-
161
-
162
-
163
-
164
-
165
-
166
-
167
-
168
-
169
-
170
-
171
-
172
-
173
-
174
-
175
-
176
-
177
-
178
-
179
-
180
-
181
-
182
-
183
-
184
-
185
-
186
-
187
-
188
-
189
-
190
-
191
-
192
-
193
-
194
-
195
-
196
-
197
-
198
-
199
-
200
-
201
-
202
-
203
-
204
-
205
-
206
-
207
-
208
-
209
-
210
-
211
-
212
-
213
-
214
-
215
-
216
-
217
-
218
-
219
-
220
-
221
-
222
-
223
-
224
-
225
-
226
-
227
-
228
-
229
-
230
-
231
-
232
-
233
-
234
-
235
-
236
-
237
-
238
-
239
-
240
-
241
-
242
-
243
-
244
-
245
-
246
-
247
-
248
-
249
-
250
-
251
-
252
-
253
-
254
-
255
-
256
-
257
-
258
-
259
-
260
-
261
-
262
-
263
-
264
-
265
-
266
-
267
-
268
-
269
-
270
-
271
-
272
-
273
-
274
-
275
-
276
-
277
-
278
-
279
-
280
-
281
-
282
 |
 |
