HP D530 HP Compaq Business Desktops d530 Convertible Minitower - (English) Har - Page 44
Removing a Drive from the Drive Bay, Appendix B, PATA Hard Drive, Installation Guidelines. - audio drivers
 |
UPC - 808736649308
View all HP D530 manuals
Add to My Manuals
Save this manual to your list of manuals |
Page 44 highlights
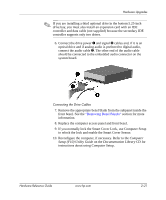
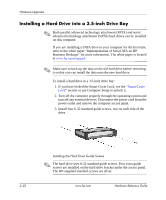
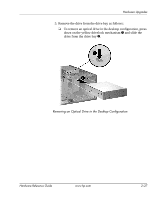
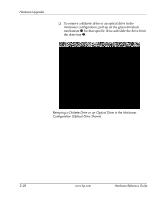
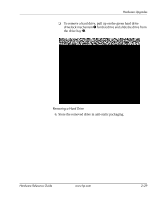
Hardware Upgrades ✎ If you have installed a PATA hard drive that is not automatically recognized by the computer, see Appendix B, "PATA Hard Drive Installation Guidelines." If you have installed a SATA hard drive that is not automatically recognized by the computer, refer to the white paper "Implementation of Serial ATA on HP Business Desktops" for operating system instructions. The white paper is located at www.hp.com/support. ✎ If you replaced the primary hard drive, insert the Restore Plus! CD to restore the operating system, software drivers, and any software applications that were preinstalled on the computer. Follow the instructions in the guide included with the Restore Plus! CD. When the restore process has completed, reinstall any personal files that you backed up before replacing the hard drive. Removing a Drive from the Drive Bay 1. If you have locked the Smart Cover Lock, see the "Smart Cover Lock" section or use Computer Setup to unlock it. 2. Turn off the computer properly through the operating system and turn off any external devices. Disconnect the power cord from the power outlet and remove the computer access panel. 3. Remove the front bezel. 4. Disconnect the power and data cables on the back of the drive. If it is an optical drive, you may also need to disconnect the audio connector. Ä CAUTION: When removing the cables, pull the tab or connector instead of the cable itself to avoid damaging the cable. 2-26 www.hp.com Hardware Reference Guide
-
 1
1 -
2
-
3
-
4
-
5
-
6
-
7
-
8
-
9
-
10
-
11
-
12
-
13
-
14
-
15
-
16
-
17
-
18
-
19
-
20
-
21
-
22
-
23
-
24
-
25
-
26
-
27
-
28
-
29
-
30
-
31
-
32
-
33
-
34
-
35
-
36
-
37
-
38
-
 39
39 -
 40
40 -
 41
41 -
 42
42 -
 43
43 -
 44
44 -
 45
45 -
 46
46 -
 47
47 -
 48
48 -
 49
49 -
50
-
51
-
52
-
53
-
54
-
55
-
56
-
57
-
58
-
59
-
60
-
61
-
62
-
63
-
64
-
65
-
66
-
67
-
68
-
69
-
70
-
71
-
72
-
73
-
74
-
75
-
76
-
77
-
78
-
79
-
80
 |
 |