HP Designjet 230 Service Manual - Page 36
Configuring the Plotter, Verifying Plotter Operation, ThirdĆParty Inks and OffĆAxis Ink Systems - error code
 |
View all HP Designjet 230 manuals
Add to My Manuals
Save this manual to your list of manuals |
Page 36 highlights
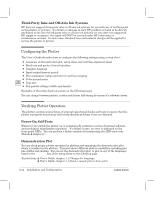
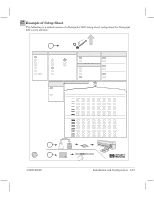
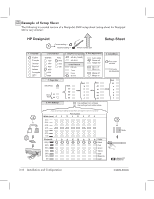
ThirdĆParty Inks and OffĆAxis Ink Systems HP does not support thirdĆparty inks or offĆaxis ink systems for use with any of its DesignJet series plotters or printers. If a failure or damage to such HP products is found to be directly attributed to the use of thirdĆparty inks or offĆaxis ink systems (or any other nonĆsupported HP supply or accessory), the repair will NOT be covered under HP's warranty or maintenance contract. In such cases, standard time and material charges will be applied to service the plotter or printer. Configuring the Plotter The User's Guide describes how to configure the following settings using a setup sheet : D Language of demonstration plot, setup sheet and cartridgeĆalignment sheet D Baud rate and parity of serial interface D Graphics language D Input/output timeout period D Plot orientation (rotate and mirror) and line merging D Color/monochrome 330 350C D Page size D PenĆpalette settings (width and density) Examples of the setup sheets are given on the following pages. You can change between pattern, scatter and cluster halfĆtoning by means of a software driver. Verifying Plotter Operation The plotters contain several types of internal operational checks and tests to ensure that the plotter is properly functioning and to help identify problems if any are detected. PowerĆOn SelfĆTests Whenever you switch the plotter on, it automatically performs a series of internal selfĆtests and mechanical initialization sequences. If a failure occurs, an error is indicated on the frontĆpanel LEDs. You can perform a failure analysis by interpreting the LED error code. (Details ' chapter 8.) Demonstration Plot You can check proper plotter operation by plotting and examining the demonstration plot, which is resident in the plotters. This plot shows different plotter capabilities including pen line widths and shading. You can set the demonstration plot, to plot in any of the languages listed in the Language box of the setup sheet on the following page. (Instructions ' User's Guide, chapter 1, w Change the language, ' User's Guide, chapter 1, w Send a sample plot or demo plot.) 3Ć14 Installation and Configuration C4699Ć90000
-
 1
1 -
2
-
3
-
4
-
5
-
6
-
7
-
8
-
9
-
10
-
11
-
12
-
13
-
14
-
15
-
16
-
17
-
18
-
19
-
20
-
21
-
22
-
23
-
24
-
25
-
26
-
27
-
28
-
29
-
30
-
 31
31 -
 32
32 -
 33
33 -
 34
34 -
 35
35 -
 36
36 -
 37
37 -
 38
38 -
 39
39 -
 40
40 -
 41
41 -
42
-
43
-
44
-
45
-
46
-
47
-
48
-
49
-
50
-
51
-
52
-
53
-
54
-
55
-
56
-
57
-
58
-
59
-
60
-
61
-
62
-
63
-
64
-
65
-
66
-
67
-
68
-
69
-
70
-
71
-
72
-
73
-
74
-
75
-
76
-
77
-
78
-
79
-
80
-
81
-
82
-
83
-
84
-
85
-
86
-
87
-
88
-
89
-
90
-
91
-
92
-
93
-
94
-
95
-
96
-
97
-
98
-
99
-
100
-
101
-
102
-
103
-
104
-
105
-
106
-
107
-
108
-
109
-
110
-
111
-
112
-
113
-
114
-
115
-
116
-
117
-
118
-
119
-
120
-
121
-
122
-
123
-
124
-
125
-
126
-
127
-
128
-
129
-
130
-
131
-
132
-
133
-
134
-
135
-
136
-
137
-
138
-
139
-
140
-
141
-
142
-
143
-
144
-
145
-
146
-
147
-
148
-
149
-
150
-
151
-
152
-
153
-
154
-
155
-
156
-
157
-
158
-
159
-
160
-
161
-
162
-
163
-
164
-
165
-
166
-
167
-
168
-
169
-
170
-
171
-
172
-
173
-
174
-
175
-
176
-
177
-
178
-
179
-
180
-
181
-
182
-
183
-
184
-
185
-
186
-
187
-
188
-
189
-
190
-
191
-
192
-
193
-
194
-
195
-
196
-
197
-
198
-
199
-
200
-
201
-
202
-
203
-
204
-
205
-
206
-
207
-
208
-
209
-
210
-
211
-
212
-
213
-
214
-
215
-
216
-
217
-
218
-
219
-
220
-
221
-
222
-
223
-
224
-
225
-
226
-
227
-
228
-
229
-
230
-
231
-
232
-
233
-
234
-
235
-
236
-
237
-
238
-
239
-
240
-
241
-
242
-
243
-
244
-
245
-
246
-
247
-
248
-
249
-
250
-
251
-
252
-
253
-
254
-
255
-
256
-
257
-
258
-
259
-
260
-
261
-
262
-
263
-
264
-
265
-
266
-
267
-
268
 |
 |