HP Designjet 230 Service Manual - Page 80
Pull the motor out to the right of the, plastic is parallel with the side of
 |
View all HP Designjet 230 manuals
Add to My Manuals
Save this manual to your list of manuals |
Page 80 highlights
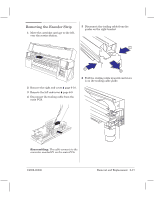
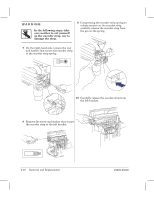
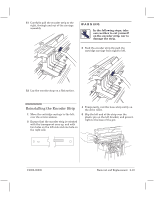
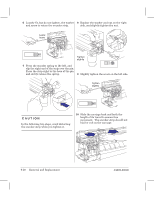
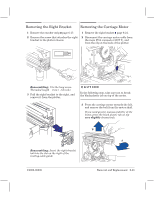
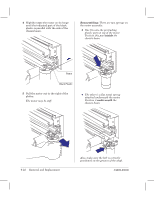
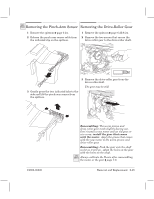
4 Slightly rotate the motor on its hinge until the indicated part of the black plastic is parallel with the side of the chassis beam. Reassembling: There are two springs on the motor assembly: D One fits onto the protruding plastic part on top of the motor. Position this part inside the chassis beam. Beam Black Plastic 5 Pull the motor out to the right of the plotter. The motor may be stiff. D The other is a flat metal spring attached underneath the motor. Position it underneath the chassis beam. 6Ć22 Removal and Replacement Also, make sure the belt is correctly positioned on the grooves of the shaft. C4699Ć90000
-
 1
1 -
2
-
3
-
4
-
5
-
6
-
7
-
8
-
9
-
10
-
11
-
12
-
13
-
14
-
15
-
16
-
17
-
18
-
19
-
20
-
21
-
22
-
23
-
24
-
25
-
26
-
27
-
28
-
29
-
30
-
31
-
32
-
33
-
34
-
35
-
36
-
37
-
38
-
39
-
40
-
41
-
42
-
43
-
44
-
45
-
46
-
47
-
48
-
49
-
50
-
51
-
52
-
53
-
54
-
55
-
56
-
57
-
58
-
59
-
60
-
61
-
62
-
63
-
64
-
65
-
66
-
67
-
68
-
69
-
70
-
71
-
72
-
73
-
74
-
 75
75 -
 76
76 -
 77
77 -
 78
78 -
 79
79 -
 80
80 -
 81
81 -
 82
82 -
 83
83 -
 84
84 -
 85
85 -
86
-
87
-
88
-
89
-
90
-
91
-
92
-
93
-
94
-
95
-
96
-
97
-
98
-
99
-
100
-
101
-
102
-
103
-
104
-
105
-
106
-
107
-
108
-
109
-
110
-
111
-
112
-
113
-
114
-
115
-
116
-
117
-
118
-
119
-
120
-
121
-
122
-
123
-
124
-
125
-
126
-
127
-
128
-
129
-
130
-
131
-
132
-
133
-
134
-
135
-
136
-
137
-
138
-
139
-
140
-
141
-
142
-
143
-
144
-
145
-
146
-
147
-
148
-
149
-
150
-
151
-
152
-
153
-
154
-
155
-
156
-
157
-
158
-
159
-
160
-
161
-
162
-
163
-
164
-
165
-
166
-
167
-
168
-
169
-
170
-
171
-
172
-
173
-
174
-
175
-
176
-
177
-
178
-
179
-
180
-
181
-
182
-
183
-
184
-
185
-
186
-
187
-
188
-
189
-
190
-
191
-
192
-
193
-
194
-
195
-
196
-
197
-
198
-
199
-
200
-
201
-
202
-
203
-
204
-
205
-
206
-
207
-
208
-
209
-
210
-
211
-
212
-
213
-
214
-
215
-
216
-
217
-
218
-
219
-
220
-
221
-
222
-
223
-
224
-
225
-
226
-
227
-
228
-
229
-
230
-
231
-
232
-
233
-
234
-
235
-
236
-
237
-
238
-
239
-
240
-
241
-
242
-
243
-
244
-
245
-
246
-
247
-
248
-
249
-
250
-
251
-
252
-
253
-
254
-
255
-
256
-
257
-
258
-
259
-
260
-
261
-
262
-
263
-
264
-
265
-
266
-
267
-
268
 |
 |
6Ć22
Removal and Replacement
C4699Ć90000
4
Slightly rotate the motor on its hinge
until the indicated part of the black
plastic is parallel with the side of the
chassis beam.
Beam
Black Plastic
5
Pull the motor out to the right of the
plotter.
The motor may be stiff.
Reassembling:
There are two springs on
the motor assembly:
D
One fits onto the protruding
plastic part on top of the motor.
Position this part
inside
the
chassis beam.
D
The other is a flat metal spring
attached underneath the motor.
Position it
underneath
the
chassis beam.
Also, make sure the belt is correctly
positioned on the grooves of the shaft.