HP Deskjet F4400 Windows Help - Page 72
Print troubleshooting, Envelopes print incorrectly, Printer Services - paper jam
 |
View all HP Deskjet F4400 manuals
Add to My Manuals
Save this manual to your list of manuals |
Page 72 highlights
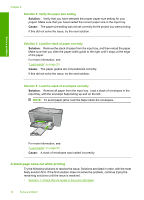
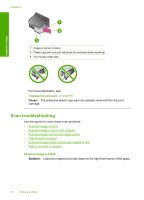
Solve a problem Aligning the printer can help ensure excellent print quality. To align the printer from the HP Photosmart Software 1. Load letter, A4, or legal unused plain white paper into the input tray. 2. In the HP Solution Center, click Settings. 3. In the Print Settings area, click Printer Toolbox. NOTE: You can also open the Printer Toolbox from the Print Properties dialog box. In the Print Properties dialog box, click the Features tab, and then click Printer Services. The Printer Toolbox appears. 4. Click the Device Services tab. 5. Click Align the Printer. The product prints a test page, aligns the print head, and calibrates the printer. Recycle or discard the page. Cause: The printer needed to be aligned. If this did not solve the issue, try the next solution. Print troubleshooting Use this section to solve these printing problems: • Envelopes print incorrectly • The product prints meaningless characters • The pages in my document came out in the wrong order • The margins are not printing as expected • A blank page came out while printing Envelopes print incorrectly Try the following solutions to resolve the issue. Solutions are listed in order, with the most likely solution first. If the first solution does not solve the problem, continue trying the remaining solutions until the issue is resolved. • Solution 1: Reload the envelopes in the input tray • Solution 2: Load a different type of envelope • Solution 3: Tuck the flaps to avoid paper jams Solution 1: Reload the envelopes in the input tray Solution: Remove all paper from the input tray. Load a stack of envelopes in the input tray, with the envelope flaps facing up and on the left. NOTE: To avoid paper jams, tuck the flaps inside the envelopes. Print troubleshooting 69
-
 1
1 -
2
-
3
-
4
-
5
-
6
-
7
-
8
-
9
-
10
-
11
-
12
-
13
-
14
-
15
-
16
-
17
-
18
-
19
-
20
-
21
-
22
-
23
-
24
-
25
-
26
-
27
-
28
-
29
-
30
-
31
-
32
-
33
-
34
-
35
-
36
-
37
-
38
-
39
-
40
-
41
-
42
-
43
-
44
-
45
-
46
-
47
-
48
-
49
-
50
-
51
-
52
-
53
-
54
-
55
-
56
-
57
-
58
-
59
-
60
-
61
-
62
-
63
-
64
-
65
-
66
-
 67
67 -
 68
68 -
 69
69 -
 70
70 -
 71
71 -
 72
72 -
 73
73 -
 74
74 -
 75
75 -
 76
76 -
 77
77 -
78
-
79
-
80
-
81
-
82
-
83
-
84
-
85
-
86
-
87
-
88
-
89
-
90
-
91
-
92
-
93
-
94
-
95
-
96
-
97
-
98
-
99
-
100
-
101
-
102
-
103
-
104
-
105
-
106
-
107
-
108
-
109
-
110
-
111
-
112
-
113
 |
 |
