HP E344c User Guide - Page 10
Front components, Setting up the monitor, WARNING, IMPORTANT
 |
View all HP E344c manuals
Add to My Manuals
Save this manual to your list of manuals |
Page 10 highlights
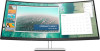
Front components Table 1-2 Front components Control Function 1 Menu button Press to open the OSD menu, select a menu item from the OSD, or close the OSD menu. 2 Function buttons Use these buttons to navigate through the OSD menu based on the indicators above the buttons that are activated while the OSD menu is open. NOTE: You can reconfigure the function buttons in the OSD menu to quickly select the most commonly used operations. See Using the function buttons on page 16 for more information. 3 Power button Turns the monitor on or off. 4 Power light White: The monitor is on. Amber: Monitor is in a reduced power state because of inactivity. See Using Auto-Sleep Mode on page 17. Setting up the monitor WARNING! To reduce the risk of serious injury, read the Safety & Comfort Guide. It describes proper workstation setup and proper posture, health, and work habits for computer users. The Safety & Comfort Guide also provides important electrical and mechanical safety information. The Safety & Comfort Guide is available on the Web at http://www.hp.com/ergo. IMPORTANT: To prevent damage to the monitor, do not touch the surface of the LCD panel. Pressure on the panel may cause nonuniformity of color or disorientation of the liquid crystals. If this occurs, the screen will not recover to its normal condition. IMPORTANT: To prevent the screen from getting scratched, defaced, or broken and prevent damage to the control buttons, position the monitor facedown on a flat surface covered with protective sheet foam or a nonabrasive cloth. 4 Chapter 1 Getting Started
-
 1
1 -
2
-
3
-
4
-
 5
5 -
 6
6 -
 7
7 -
 8
8 -
 9
9 -
 10
10 -
 11
11 -
 12
12 -
 13
13 -
 14
14 -
 15
15 -
16
-
17
-
18
-
19
-
20
-
21
-
22
-
23
-
24
-
25
-
26
-
27
-
28
-
29
-
30
-
31
-
32
-
33
-
34
-
35
-
36
 |
 |
