HP EliteBook 735 Maintenance and Service Guide - Page 44
Solid-state drive (SSD), Remove the Phillips M2.0 × 2.0 screw
 |
View all HP EliteBook 735 manuals
Add to My Manuals
Save this manual to your list of manuals |
Page 44 highlights
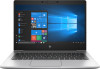
Solid-state drive (SSD) Table 5-2 Solid-state drive descriptions and part numbers Description 1 TB, PCIe, TLC 512 GB, PCIe, TLC 512 GB, PCIe, self-encrypting drive (SED), Opal 2, TLC 512 GB, PCIe, value 256 GB, PCIe, NVMe, TLC 256 GB, PCIe, NVMe, value 256 GB, SATA-3, self-encrypting drive (SED), Opal 2, TLC 128 GB, SATA-3, TLC Spare part number L62292-001 L62289-001 L62290-001 L62291-001 L62288-001 L62287-001 L62286-001 L62285-001 Before removing the solid-state drive, follow these steps: 1. Prepare the computer for disassembly (Preparation for disassembly on page 32). 2. Remove the bottom cover (see Bottom cover on page 32). 3. Disconnect the battery cable from the system board (see Battery on page 45). Remove the solid-state drive: 1. Remove the Phillips M2.0 × 2.0 screw (1) that secures the drive to the system board. 2. Remove the drive by pulling it away from the connector (2). IMPORTANT: When replacing the solid-state drive, remove the shielding from the old drive and install it on the replacement drive. Reverse this procedure to install the solid-state drive. 34 Chapter 5 Removal and replacement procedures for Customer Self-Repair parts
-
 1
1 -
2
-
3
-
4
-
5
-
6
-
7
-
8
-
9
-
10
-
11
-
12
-
13
-
14
-
15
-
16
-
17
-
18
-
19
-
20
-
21
-
22
-
23
-
24
-
25
-
26
-
27
-
28
-
29
-
30
-
31
-
32
-
33
-
34
-
35
-
36
-
37
-
38
-
 39
39 -
 40
40 -
 41
41 -
 42
42 -
 43
43 -
 44
44 -
 45
45 -
 46
46 -
 47
47 -
 48
48 -
 49
49 -
50
-
51
-
52
-
53
-
54
-
55
-
56
-
57
-
58
-
59
-
60
-
61
-
62
-
63
-
64
-
65
-
66
-
67
-
68
-
69
-
70
-
71
-
72
-
73
-
74
-
75
-
76
-
77
-
78
-
79
-
80
-
81
-
82
-
83
-
84
-
85
-
86
-
87
-
88
-
89
-
90
-
91
-
92
-
93
-
94
-
95
-
96
-
97
-
98
-
99
-
100
-
101
-
102
-
103
-
104
-
105
-
106
-
107
-
108
-
109
-
110
-
111
-
112
-
113
-
114
-
115
-
116
 |
 |
