HP HP-380467-003 Upgrading and Servicing Guide - Page 22
Installing an Add-in Card
 |
UPC - 846084030171
View all HP HP-380467-003 manuals
Add to My Manuals
Save this manual to your list of manuals |
Page 22 highlights
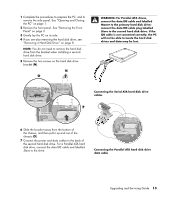
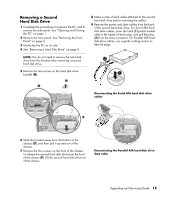
Installing an Add-in Card Replacing the Battery A lithium battery on the motherboard provides backup power for the PC's timekeeping capability. The battery has an estimated life expectancy of seven years. When the battery starts to weaken, the date and time may be incorrect. If the battery fails, replace it with a CR2032 lithium battery (3 volt, 220mAH rating) or an equivalent battery. 1 Align the edge of the add-in card with the slot on the chassis and gently but firmly press the card straight down into the add-in card slot. The whole connector should be seated properly in the card slot. 2 Insert the screw to secure the card you have replaced. 3 Connect any external or internal cables attached to the card. 4 Complete the procedures to replace the side panel and close the PC. See "Opening and Closing the PC" on page 1. WARNING: There is danger of explosion if the battery is incorrectly replaced. Replace only with the same, or equivalent, type of battery. Discard used batteries according to the manufacturer's instructions. 1 Complete the procedures to prepare the PC and to remove the side panel. See "Opening and Closing the PC" on page 1. 2 Gently lay the PC on its side. 3 Remove any cabling, if necessary, to reach the battery. 4 Remove any memory modules, if necessary, to reach the battery. See "Adding Memory" on page 16. 5 Press the latch away from the battery and lift the battery from the socket to release the battery. 6 Install the new CR2032 battery in the socket, with the positive (+) side facing the latch. 7 Replace memory modules or cables you removed. 8 Set the chassis upright. 9 Complete the procedures to replace the side panel, and to close the PC. See "Opening and Closing the PC" on page 1. NOTE: If the new card or device isn't working, read through the card manufacturer's installation instructions, and recheck all connections, including those to the card, power supply, keyboard and monitor. 18 Upgrading and Servicing Guide
-
 1
1 -
2
-
3
-
4
-
5
-
6
-
7
-
8
-
9
-
10
-
11
-
12
-
13
-
14
-
15
-
16
-
 17
17 -
 18
18 -
 19
19 -
 20
20 -
 21
21 -
 22
22 -
 23
23 -
 24
24
 |
 |
