HP LaserJet 9065mfp HP LaserJet 9055/9065 mfp - (English) System Administrator - Page 116
Image insert, Option, CHECK, START, RESET
 |
View all HP LaserJet 9065mfp manuals
Add to My Manuals
Save this manual to your list of manuals |
Page 116 highlights
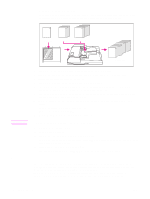
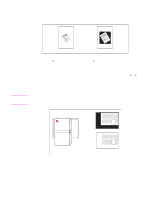
Original Blank sheet interleaving Copy sheet interleaving 1 Load copy paper in Tray 2 or 3 to match the size of transparencies. 2 Open Tray 1. Insert 1 transparency at a time into Tray 1, and adjust the paper guides. Note Do not load transparencies into any other tray. 3 Touch OUTPUT on the main screen to display the output selection screen. 4 Touch OHT interleave to display the OHT interleave screen. 5 Touch Blank sheet interleaving or Copy sheet interleaving, unless it is already highlighted. 6 Touch OK. 7 Make additional output selections, or touch OK to return to the main screen. 8 The quantity is already set to 1. You cannot enter any other quantity. 9 Place the original face up in the document feeder or face down on the scanner glass. Note Option: Press CHECK to view the selection and make a proof copy, if desired. Touch EXIT to return to the main screen. See "Check and proof copy" on page 70. 10 Press START. After copying is completed, touch OHT interleave on the output selection screen or press RESET to release the mode and reset the MFP. Image insert Use the image insert mode to combine images scanned from the scanner glass, such as photos, paste-ups, newspaper articles, graphs, etcetera, with images scanned from the document feeder. Then, output the combined images as a finished set. The selected copy paper size is determined by the size of originals loaded in the document feeder. ● all images are stored in memory ● maximum image insert: 30 locations ● original/copy size: Ledger, Legal, Letter-R, Letter, 5.5 by 8.5 ● incompatible basic copying conditions: group, rotation sort, rotation group ● incompatible originals: mixed original, tab paper ● incompatible output: sheet/cover insertion, chapter, combination, OHT interleave, book copy, program job, erase non-image area, repeat, auto layout, overlay, storing image in overlay memory 106 Output function ENWW
-
 1
1 -
2
-
3
-
4
-
5
-
6
-
7
-
8
-
9
-
10
-
11
-
12
-
13
-
14
-
15
-
16
-
17
-
18
-
19
-
20
-
21
-
22
-
23
-
24
-
25
-
26
-
27
-
28
-
29
-
30
-
31
-
32
-
33
-
34
-
35
-
36
-
37
-
38
-
39
-
40
-
41
-
42
-
43
-
44
-
45
-
46
-
47
-
48
-
49
-
50
-
51
-
52
-
53
-
54
-
55
-
56
-
57
-
58
-
59
-
60
-
61
-
62
-
63
-
64
-
65
-
66
-
67
-
68
-
69
-
70
-
71
-
72
-
73
-
74
-
75
-
76
-
77
-
78
-
79
-
80
-
81
-
82
-
83
-
84
-
85
-
86
-
87
-
88
-
89
-
90
-
91
-
92
-
93
-
94
-
95
-
96
-
97
-
98
-
99
-
100
-
101
-
102
-
103
-
104
-
105
-
106
-
107
-
108
-
109
-
110
-
 111
111 -
 112
112 -
 113
113 -
 114
114 -
 115
115 -
 116
116 -
 117
117 -
 118
118 -
 119
119 -
 120
120 -
 121
121 -
122
-
123
-
124
-
125
-
126
-
127
-
128
-
129
-
130
-
131
-
132
-
133
-
134
-
135
-
136
-
137
-
138
-
139
-
140
-
141
-
142
-
143
-
144
-
145
-
146
-
147
-
148
-
149
-
150
-
151
-
152
-
153
-
154
-
155
-
156
-
157
-
158
-
159
-
160
-
161
-
162
-
163
-
164
-
165
-
166
-
167
-
168
-
169
-
170
-
171
-
172
-
173
-
174
-
175
-
176
-
177
-
178
-
179
-
180
-
181
-
182
-
183
-
184
-
185
-
186
-
187
-
188
-
189
-
190
-
191
-
192
-
193
-
194
-
195
-
196
-
197
-
198
-
199
-
200
-
201
-
202
-
203
-
204
-
205
-
206
-
207
-
208
-
209
-
210
-
211
-
212
-
213
-
214
-
215
-
216
-
217
-
218
-
219
-
220
-
221
-
222
-
223
-
224
 |
 |
