HP LaserJet 9065mfp HP LaserJet 9055/9065 mfp - (English) System Administrator - Page 124
OUTPUT, Repeat, Vertical/Horizontal, Enter repeat width by keypad, Vert./Horiz, Repeat, Repeat,
 |
View all HP LaserJet 9065mfp manuals
Add to My Manuals
Save this manual to your list of manuals |
Page 124 highlights
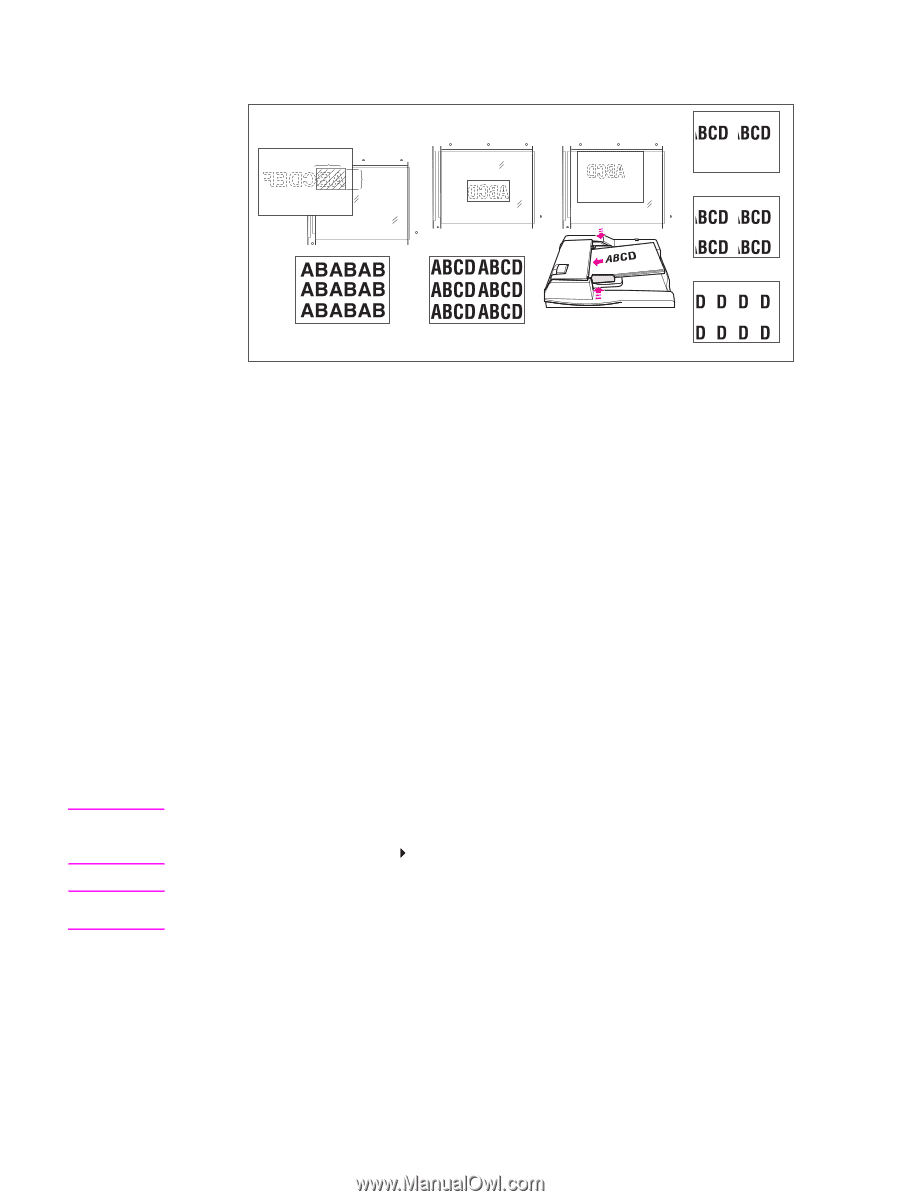
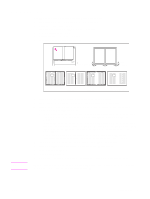
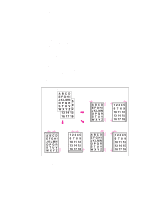
Note Note Vertical/horizontal width setting mode Auto detection mode 2/4/8 repeat mode Copy (2 repeat) Copy (4 repeat) Copy Copy (AUTO) Copy (8 repeat) 1 Touch OUTPUT on the main screen to display the output selection screen. 2 Touch Repeat to display the repeat mode selection screen. 3 To select the vertical/horizontal width setting mode: a Touch Vertical/Horizontal. b Specify the vertical and horizontal widths of the scanning area using up/down arrow key, from 10 - 150 mm in 1 mm increments. Keep touching the key to increase/decrease the value continuously. Or, touch Enter repeat width by keypad to display the popup screen to enter the value from the touchscreen keys. Touch Vert./Horiz key on the popup screen each time to shift it from one to another. Touch OK to restore the repeat mode selection screen To select the auto detection mode, touch AUTO. Erase non-image area will function automatically. To select the repeat mode, touch 2 Repeat, 4 Repeat, or 8 Repeat, as desired. 4 Touch OK to return to the output selection screen. 5 Select additional copying features, as desired. When 2 Repeat mode is selected, page space function of image shift can be used to make the desired amount of blank space between the 2 images on a page. 6 Touch OK to complete the setting and return to the main screen. 7 Enter the desired quantity. 8 Position original(s) face down on the scanner glass. Do not close the document feeder when AUTO, 2 repeat, 4 repeat, or 8 repeat is selected in step 3. When using glass store mode, 1`2 mode can be selected. Option: Press CHECK to view the selection and make a proof copy, if desired. Touch EXIT to return to the main screen. See "Check and proof copy" on page 70. 9 Press START. After copying is completed, touch Repeat on the output selection screen or press RESET to release the mode and reset the MFP. 114 Output function ENWW
-
 1
1 -
2
-
3
-
4
-
5
-
6
-
7
-
8
-
9
-
10
-
11
-
12
-
13
-
14
-
15
-
16
-
17
-
18
-
19
-
20
-
21
-
22
-
23
-
24
-
25
-
26
-
27
-
28
-
29
-
30
-
31
-
32
-
33
-
34
-
35
-
36
-
37
-
38
-
39
-
40
-
41
-
42
-
43
-
44
-
45
-
46
-
47
-
48
-
49
-
50
-
51
-
52
-
53
-
54
-
55
-
56
-
57
-
58
-
59
-
60
-
61
-
62
-
63
-
64
-
65
-
66
-
67
-
68
-
69
-
70
-
71
-
72
-
73
-
74
-
75
-
76
-
77
-
78
-
79
-
80
-
81
-
82
-
83
-
84
-
85
-
86
-
87
-
88
-
89
-
90
-
91
-
92
-
93
-
94
-
95
-
96
-
97
-
98
-
99
-
100
-
101
-
102
-
103
-
104
-
105
-
106
-
107
-
108
-
109
-
110
-
111
-
112
-
113
-
114
-
115
-
116
-
117
-
118
-
 119
119 -
 120
120 -
 121
121 -
 122
122 -
 123
123 -
 124
124 -
 125
125 -
 126
126 -
 127
127 -
 128
128 -
 129
129 -
130
-
131
-
132
-
133
-
134
-
135
-
136
-
137
-
138
-
139
-
140
-
141
-
142
-
143
-
144
-
145
-
146
-
147
-
148
-
149
-
150
-
151
-
152
-
153
-
154
-
155
-
156
-
157
-
158
-
159
-
160
-
161
-
162
-
163
-
164
-
165
-
166
-
167
-
168
-
169
-
170
-
171
-
172
-
173
-
174
-
175
-
176
-
177
-
178
-
179
-
180
-
181
-
182
-
183
-
184
-
185
-
186
-
187
-
188
-
189
-
190
-
191
-
192
-
193
-
194
-
195
-
196
-
197
-
198
-
199
-
200
-
201
-
202
-
203
-
204
-
205
-
206
-
207
-
208
-
209
-
210
-
211
-
212
-
213
-
214
-
215
-
216
-
217
-
218
-
219
-
220
-
221
-
222
-
223
-
224
 |
 |