HP LaserJet M2727 HP LaserJet M2727 MFP Series - User Guide - Page 117
Change fax settings, Set the sound-volume settings, Set the fax-sounds (line-monitor) volume
 |
View all HP LaserJet M2727 manuals
Add to My Manuals
Save this manual to your list of manuals |
Page 117 highlights
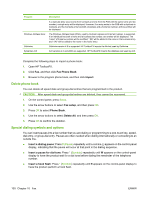
Change fax settings Set the sound-volume settings Control the volume of the fax sounds from the control panel. You can make changes to the following sounds: ● The fax sounds that are associated with incoming and outgoing faxes ● The ring for incoming faxes The factory-set default for the fax-sounds volume is Soft. Set the fax-sounds (line-monitor) volume Complete the following steps to change the fax-sounds volume. 1. Press Volume on the control panel. 2. Use the arrow buttons to select Off, Soft, Medium, or Loud. 3. Press OK to save the selection. Set the ring volume When the product is initially receiving a call, a ring alert is audible. The ring duration length is based on the local telephone company ring-pattern length. The factory-set default for the ring volume is Soft. 1. Press Setup. 2. Use the arrow buttons to select System setup, and then press OK. 3. Use the arrow buttons to select Volume settings, and then press OK. 4. Use the arrow buttons to select Ring volume, and then press OK. 5. Use the arrow buttons to select Off, Soft, Medium, or Loud. 6. Press OK to save the selection. Send fax settings Set a dial prefix A dial prefix is a number or group of numbers that are automatically added to the beginning of every fax number you enter at the control panel or from the software. The maximum number of characters for a dial prefix is 50. The default setting is Off. You might want to turn this setting on and enter a prefix if, for example, you have to dial a number such as 9 to get a telephone line outside of your company telephone system. While this setting is activated, you can dial a fax number without the dial prefix by using manual dial. For instructions, see Manual dial faxing on page 120. 1. On the control panel, press Setup. 2. Use the arrow buttons to select Fax setup, and then press OK. 3. Use the arrow buttons to select Fax Send setup, and then press OK. ENWW Change fax settings 105
-
 1
1 -
2
-
3
-
4
-
5
-
6
-
7
-
8
-
9
-
10
-
11
-
12
-
13
-
14
-
15
-
16
-
17
-
18
-
19
-
20
-
21
-
22
-
23
-
24
-
25
-
26
-
27
-
28
-
29
-
30
-
31
-
32
-
33
-
34
-
35
-
36
-
37
-
38
-
39
-
40
-
41
-
42
-
43
-
44
-
45
-
46
-
47
-
48
-
49
-
50
-
51
-
52
-
53
-
54
-
55
-
56
-
57
-
58
-
59
-
60
-
61
-
62
-
63
-
64
-
65
-
66
-
67
-
68
-
69
-
70
-
71
-
72
-
73
-
74
-
75
-
76
-
77
-
78
-
79
-
80
-
81
-
82
-
83
-
84
-
85
-
86
-
87
-
88
-
89
-
90
-
91
-
92
-
93
-
94
-
95
-
96
-
97
-
98
-
99
-
100
-
101
-
102
-
103
-
104
-
105
-
106
-
107
-
108
-
109
-
110
-
111
-
 112
112 -
 113
113 -
 114
114 -
 115
115 -
 116
116 -
 117
117 -
 118
118 -
 119
119 -
 120
120 -
 121
121 -
 122
122 -
123
-
124
-
125
-
126
-
127
-
128
-
129
-
130
-
131
-
132
-
133
-
134
-
135
-
136
-
137
-
138
-
139
-
140
-
141
-
142
-
143
-
144
-
145
-
146
-
147
-
148
-
149
-
150
-
151
-
152
-
153
-
154
-
155
-
156
-
157
-
158
-
159
-
160
-
161
-
162
-
163
-
164
-
165
-
166
-
167
-
168
-
169
-
170
-
171
-
172
-
173
-
174
-
175
-
176
-
177
-
178
-
179
-
180
-
181
-
182
-
183
-
184
-
185
-
186
-
187
-
188
-
189
-
190
-
191
-
192
-
193
-
194
-
195
-
196
-
197
-
198
-
199
-
200
-
201
-
202
-
203
-
204
-
205
-
206
-
207
-
208
-
209
-
210
-
211
-
212
-
213
-
214
-
215
-
216
-
217
-
218
-
219
-
220
-
221
-
222
-
223
-
224
-
225
-
226
-
227
-
228
-
229
-
230
-
231
-
232
-
233
-
234
-
235
-
236
-
237
-
238
-
239
-
240
-
241
-
242
-
243
-
244
-
245
-
246
-
247
-
248
-
249
-
250
-
251
-
252
-
253
-
254
-
255
-
256
-
257
-
258
-
259
-
260
-
261
-
262
-
263
-
264
-
265
-
266
 |
 |