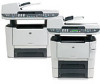
HP LaserJet M2727 HP LaserJet M2727 MFP Series - User Guide - Page 63
Con trays, Change tray selection, Paper handling, System setup, Paper setup, Paper type
 |
View all HP LaserJet M2727 manuals
Add to My Manuals
Save this manual to your list of manuals |
Page 63 highlights
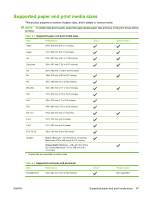
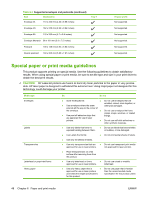
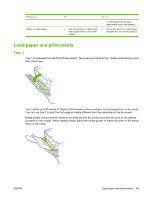
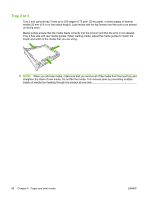
Configure trays When using one of the trays for specific size of paper, you can set the default size for the tray in HP ToolboxFX or from the control panel. In HP ToolboxFX, select Paper handling, and then select the size for the tray you want to set. When you select that size of paper for a print job in the print dialog, the product automatically selects that tray for printing. To set the default paper size or type from the control panel, complete the following steps. 1. On the product control panel, press Setup. 2. Use the arrow buttons to select System setup, and then press OK. 3. Use the arrow keys to select Paper setup, and then press OK. 4. Use the arrow keys to select the tray to be configured, and then press OK. 5. Use the arrow keys to select either Paper type or Paper size, and then press OK. 6. Use the arrow keys to select a default type or size for the tray, and then press OK. Change tray selection The product is set to automatically pull media from trays that contain media. The product always pulls media from tray 1 if you insert media into tray 1. If there is no media in tray 1, the product attempts to pull media from tray 3, if installed, and then from tray 2. You can specify which tray you want to use by changing the tray selection. Auto select, Tray 1, Tray 2, and Tray 3 are available settings. Auto select will pull media from the first available tray with the appropriate matching media loaded. NOTE: Tray 3 is only available if a tray 3 is installed. Change the tray selection for the current job 1. On the product control panel, press Tray Select. 2. Use the arrow buttons to select the input tray that you want to use. 3. Press Start Copy to save the selection and immediately start the copy job, or press OK to save the selection without starting the job. Change the default tray selection 1. On the product control panel, press Setup. 2. Use the arrow buttons to select Copy setup, and then press OK. 3. Use the arrow buttons to select Def. Tray Select, and then press OK. 4. Use the arrow buttons to select a tray setting, and then press OK. ENWW Configure trays 51
-
 1
1 -
2
-
3
-
4
-
5
-
6
-
7
-
8
-
9
-
10
-
11
-
12
-
13
-
14
-
15
-
16
-
17
-
18
-
19
-
20
-
21
-
22
-
23
-
24
-
25
-
26
-
27
-
28
-
29
-
30
-
31
-
32
-
33
-
34
-
35
-
36
-
37
-
38
-
39
-
40
-
41
-
42
-
43
-
44
-
45
-
46
-
47
-
48
-
49
-
50
-
51
-
52
-
53
-
54
-
55
-
56
-
57
-
 58
58 -
 59
59 -
 60
60 -
 61
61 -
 62
62 -
 63
63 -
 64
64 -
 65
65 -
 66
66 -
 67
67 -
 68
68 -
69
-
70
-
71
-
72
-
73
-
74
-
75
-
76
-
77
-
78
-
79
-
80
-
81
-
82
-
83
-
84
-
85
-
86
-
87
-
88
-
89
-
90
-
91
-
92
-
93
-
94
-
95
-
96
-
97
-
98
-
99
-
100
-
101
-
102
-
103
-
104
-
105
-
106
-
107
-
108
-
109
-
110
-
111
-
112
-
113
-
114
-
115
-
116
-
117
-
118
-
119
-
120
-
121
-
122
-
123
-
124
-
125
-
126
-
127
-
128
-
129
-
130
-
131
-
132
-
133
-
134
-
135
-
136
-
137
-
138
-
139
-
140
-
141
-
142
-
143
-
144
-
145
-
146
-
147
-
148
-
149
-
150
-
151
-
152
-
153
-
154
-
155
-
156
-
157
-
158
-
159
-
160
-
161
-
162
-
163
-
164
-
165
-
166
-
167
-
168
-
169
-
170
-
171
-
172
-
173
-
174
-
175
-
176
-
177
-
178
-
179
-
180
-
181
-
182
-
183
-
184
-
185
-
186
-
187
-
188
-
189
-
190
-
191
-
192
-
193
-
194
-
195
-
196
-
197
-
198
-
199
-
200
-
201
-
202
-
203
-
204
-
205
-
206
-
207
-
208
-
209
-
210
-
211
-
212
-
213
-
214
-
215
-
216
-
217
-
218
-
219
-
220
-
221
-
222
-
223
-
224
-
225
-
226
-
227
-
228
-
229
-
230
-
231
-
232
-
233
-
234
-
235
-
236
-
237
-
238
-
239
-
240
-
241
-
242
-
243
-
244
-
245
-
246
-
247
-
248
-
249
-
250
-
251
-
252
-
253
-
254
-
255
-
256
-
257
-
258
-
259
-
260
-
261
-
262
-
263
-
264
-
265
-
266
 |
 |